This post may contain affiliate links. For more information, read my disclosure policy.
Learn how to make a lattice pie crust easily – really I promise! A woven lattice crust is stunning on top of a fruit pie but they’re easier to make than you think. With step-by-step photos and a video, you’ll be a pro in no time.
What is a Lattice Pie Crust?
Lattice top pie recipes are so gorgeous, don’t you think? A lattice pie crust looks really hard and confusing to do, but it’s much easier to make a woven crust than you think. Once you visually see the method, how to weave a lattice clicks into place and becomes really easy to do.
Lattice top pies are perfect for all sorts of fruit pies, like apple or blackberry or any fruit pie you love. It’s actually the easiest way to make a gorgeous pie!
Ingredients Needed
- Pie crust: You can use my all butter pie crust recipe or you can use a refrigerated pie crust. Don’t use a frozen pie shells – you need a crust that will lay flat. My homemade pie crust is the best…in case you were wondering.
- Tools: A knife or pizza cutter or pastry wheel for cutting the strips and a ruler to keep your edges straight.
How to make a lattice pie crust
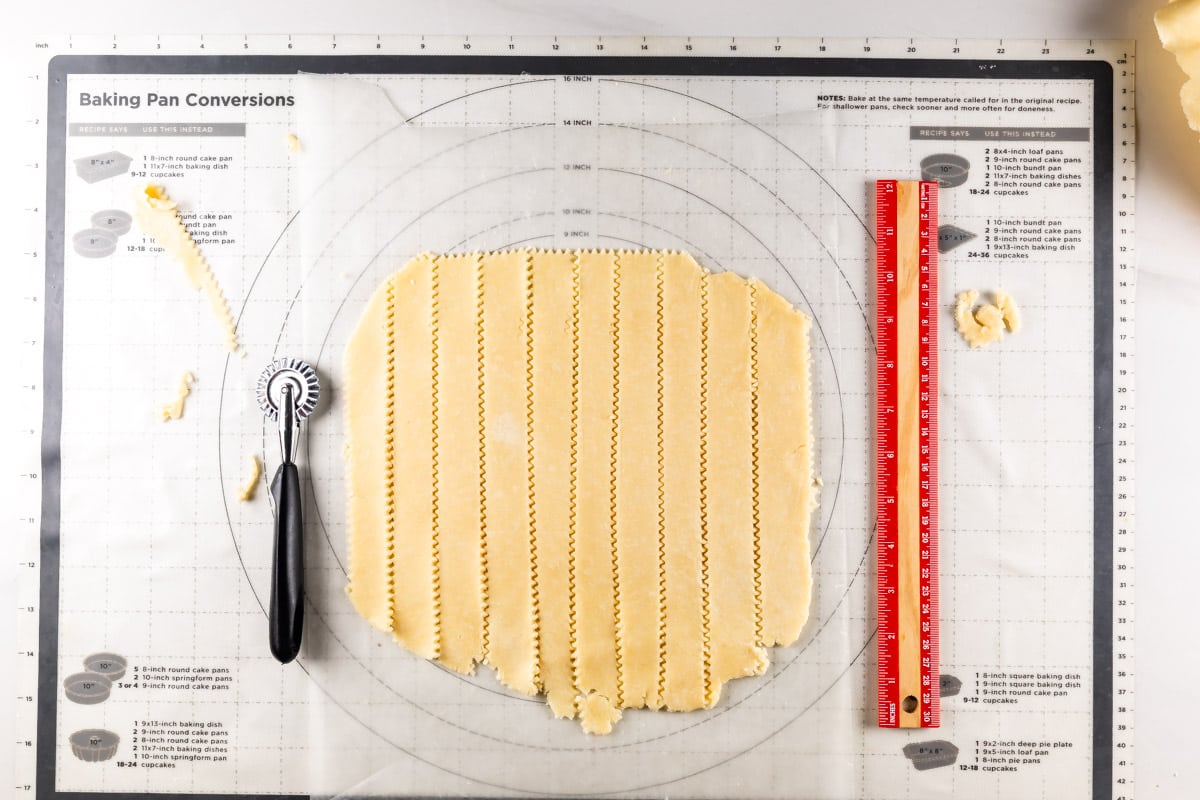
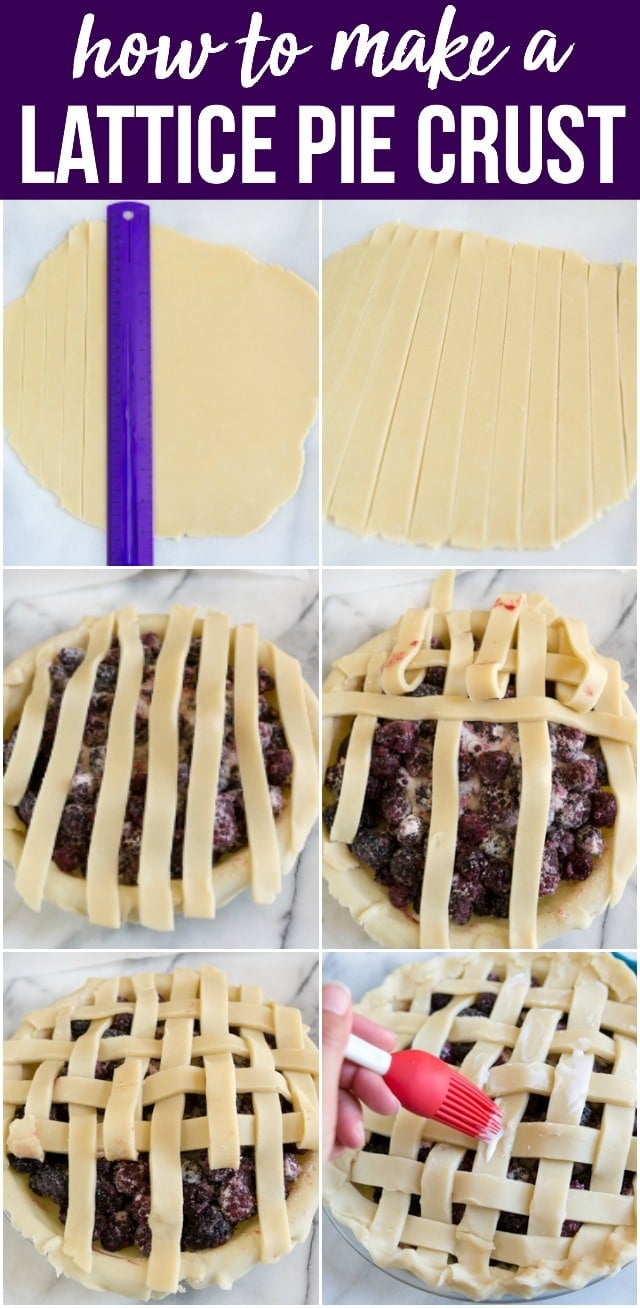
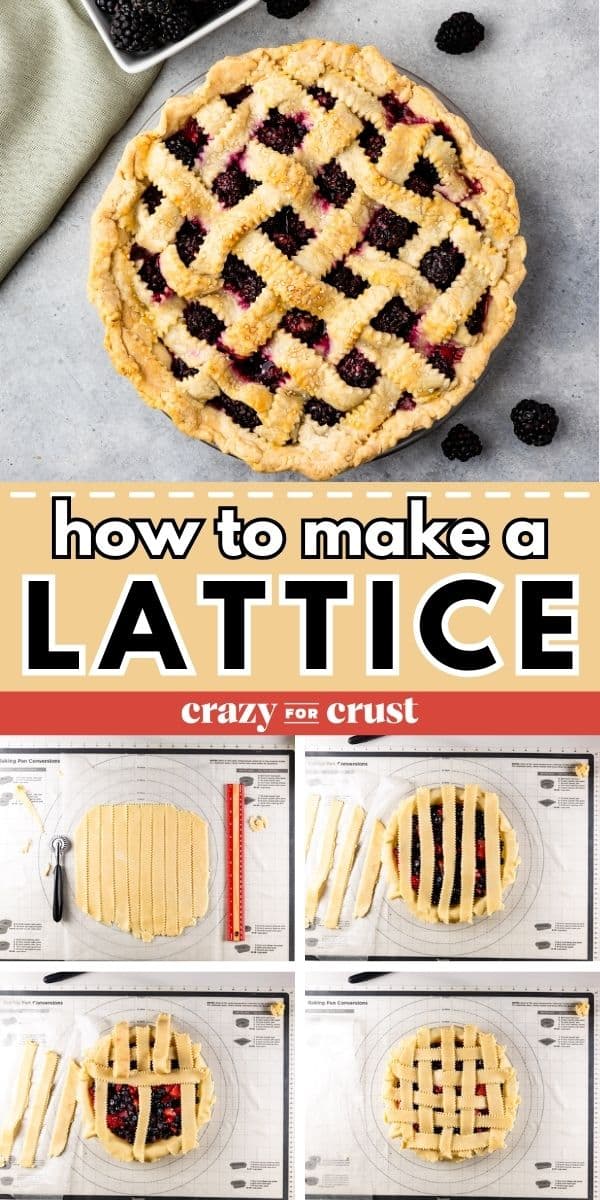
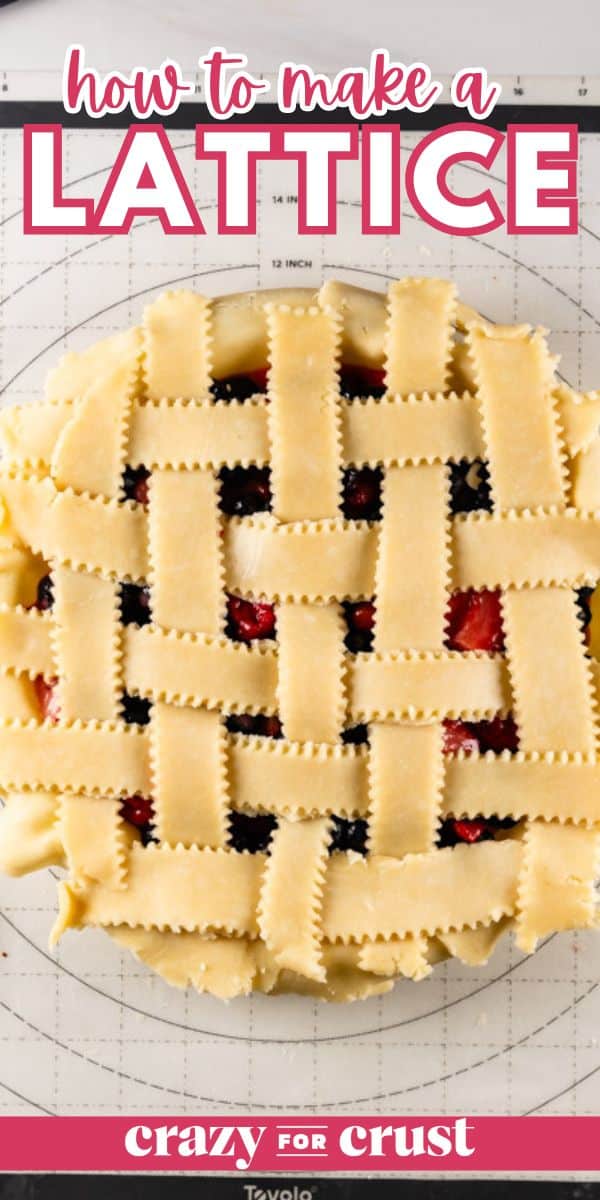
1. Roll out the top pie crust. It should be chilled a little bit, but not so long that the crust is so cold you can’t handle the strips. Using your sharp knife and ruler, cut wide strips of dough that are about 3/4 to 1-inch thick. Once your lattice is cut, you’ll have several strips.
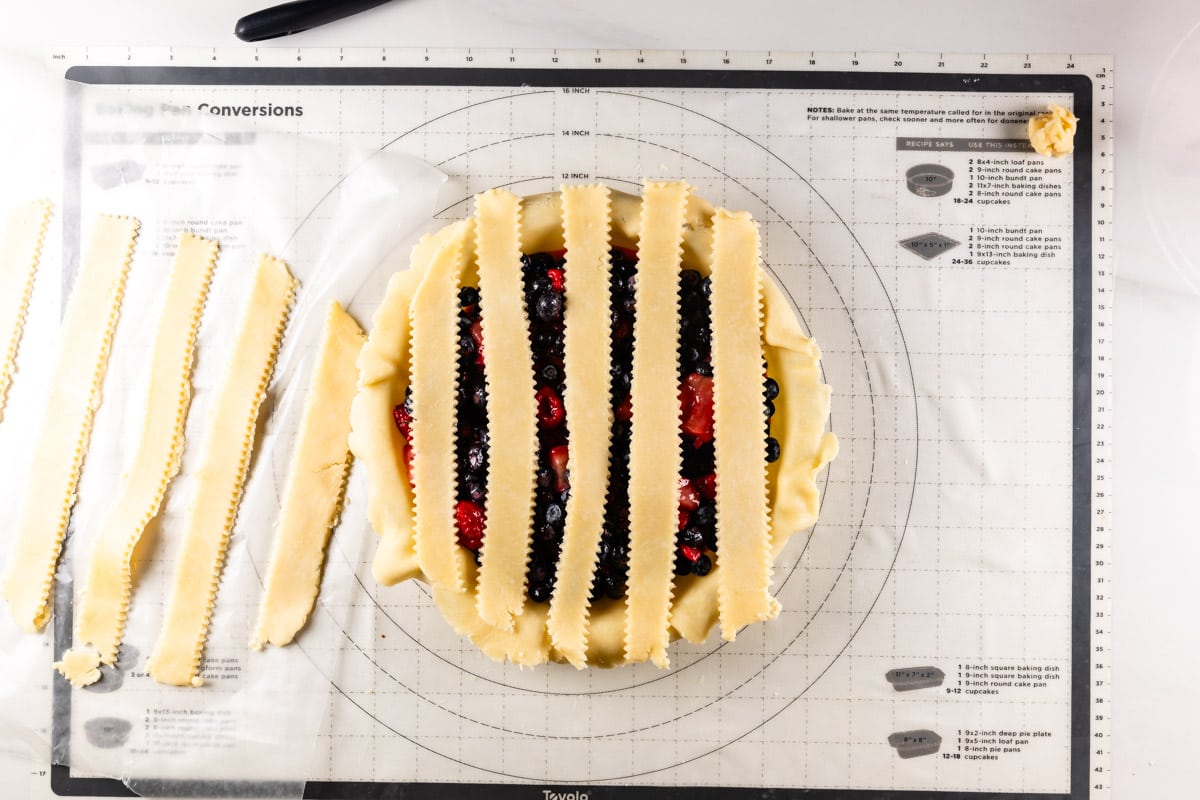
2. Place a bottom crust in your pie dish and fill with your desired filling. Take strips of the lattice and lay them on your pie vertically, leaving small gaps between. I like to line up the short strips from the edges with the edge of the pie plate and use the long strips in the middle.
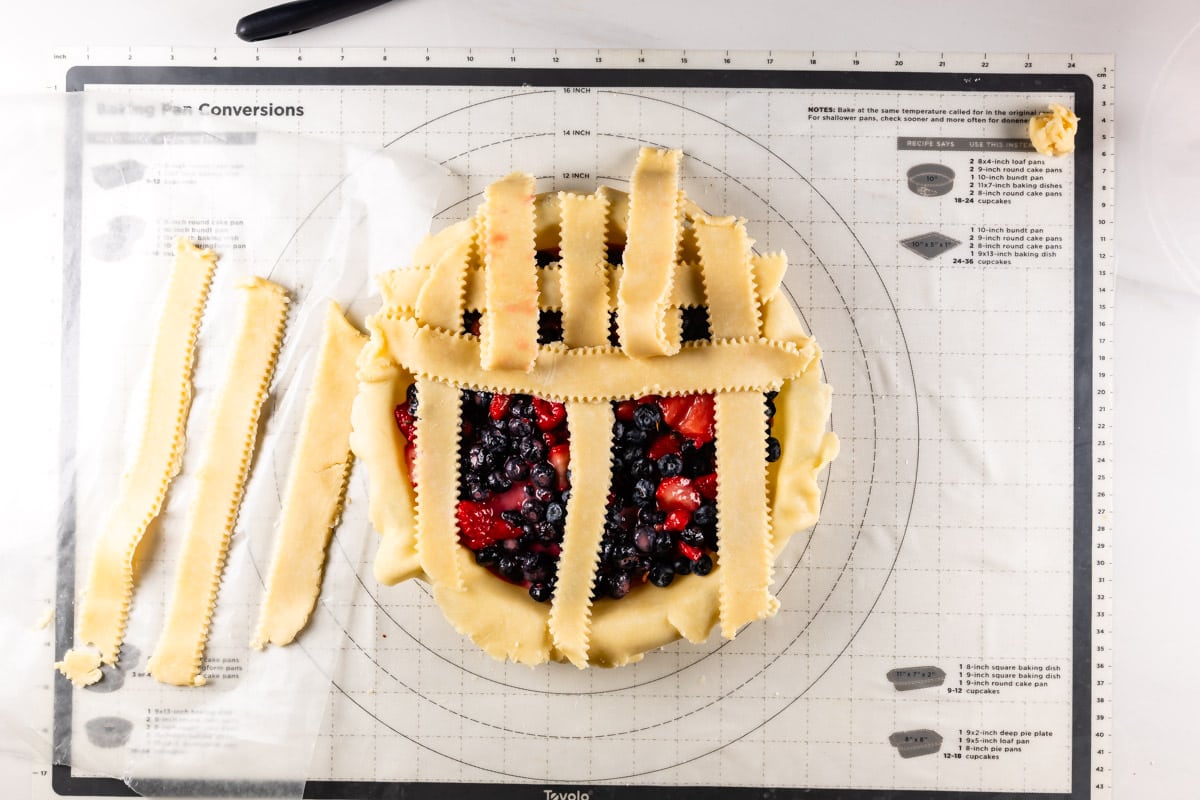
3. To weave your lattice, pull back every other vertical strip and place a new strip of pie dough perpendicular to the strips you already laid.
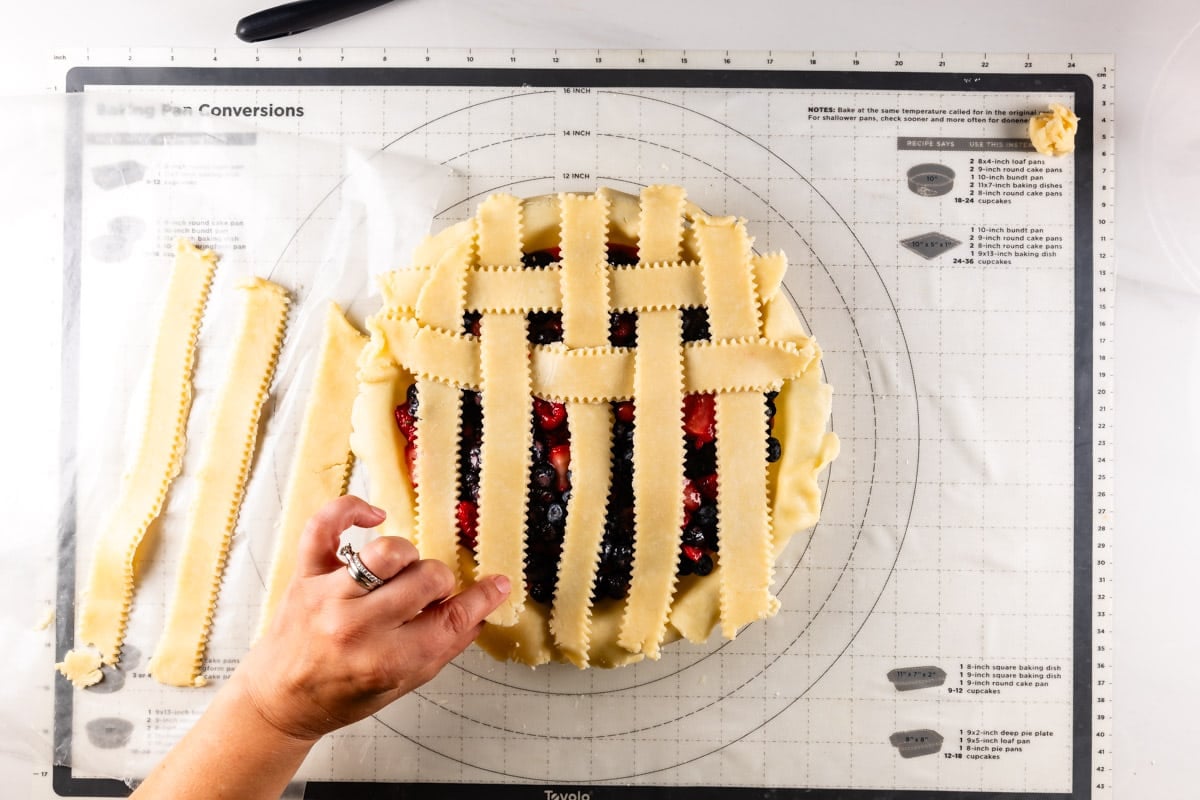
4. Replace the dough strips you folded over. Then, do the same thing with the alternating strips, placing horizontal strips of dough across. Keep going until the entire pie is covered in basket weave.
SAVE THIS RECIPE
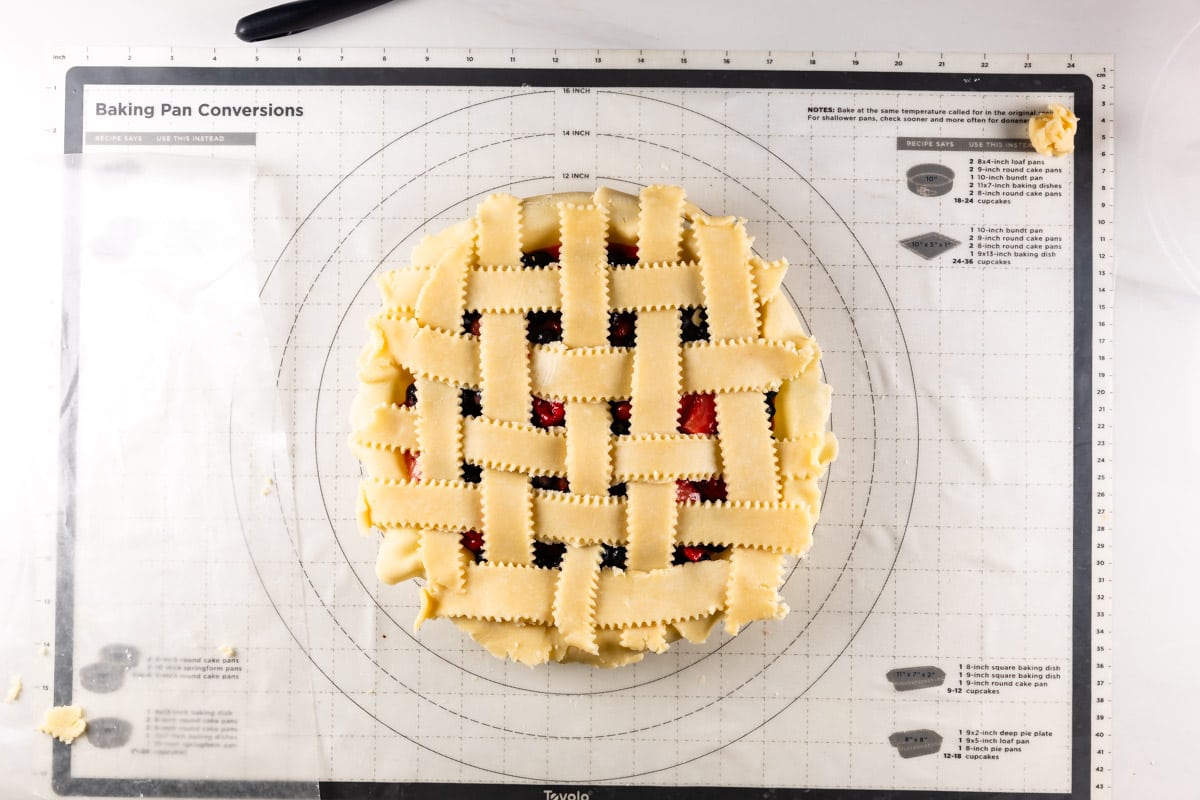
5. Once your lattice is fully on the pie, cut off any excess dough and crimp the edges as desired. I like to brush it with egg wash and add a little sparkle with sanding sugar.
How to use a Lattice Crust
- Caramel Lattice Apple Pie – don’t skip the caramel sauce!
- Raspberry Pie is the perfect way to use frozen raspberries.
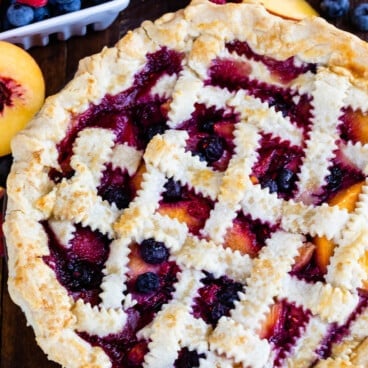
- Peach Pie is great with a lattice or crumble topping.
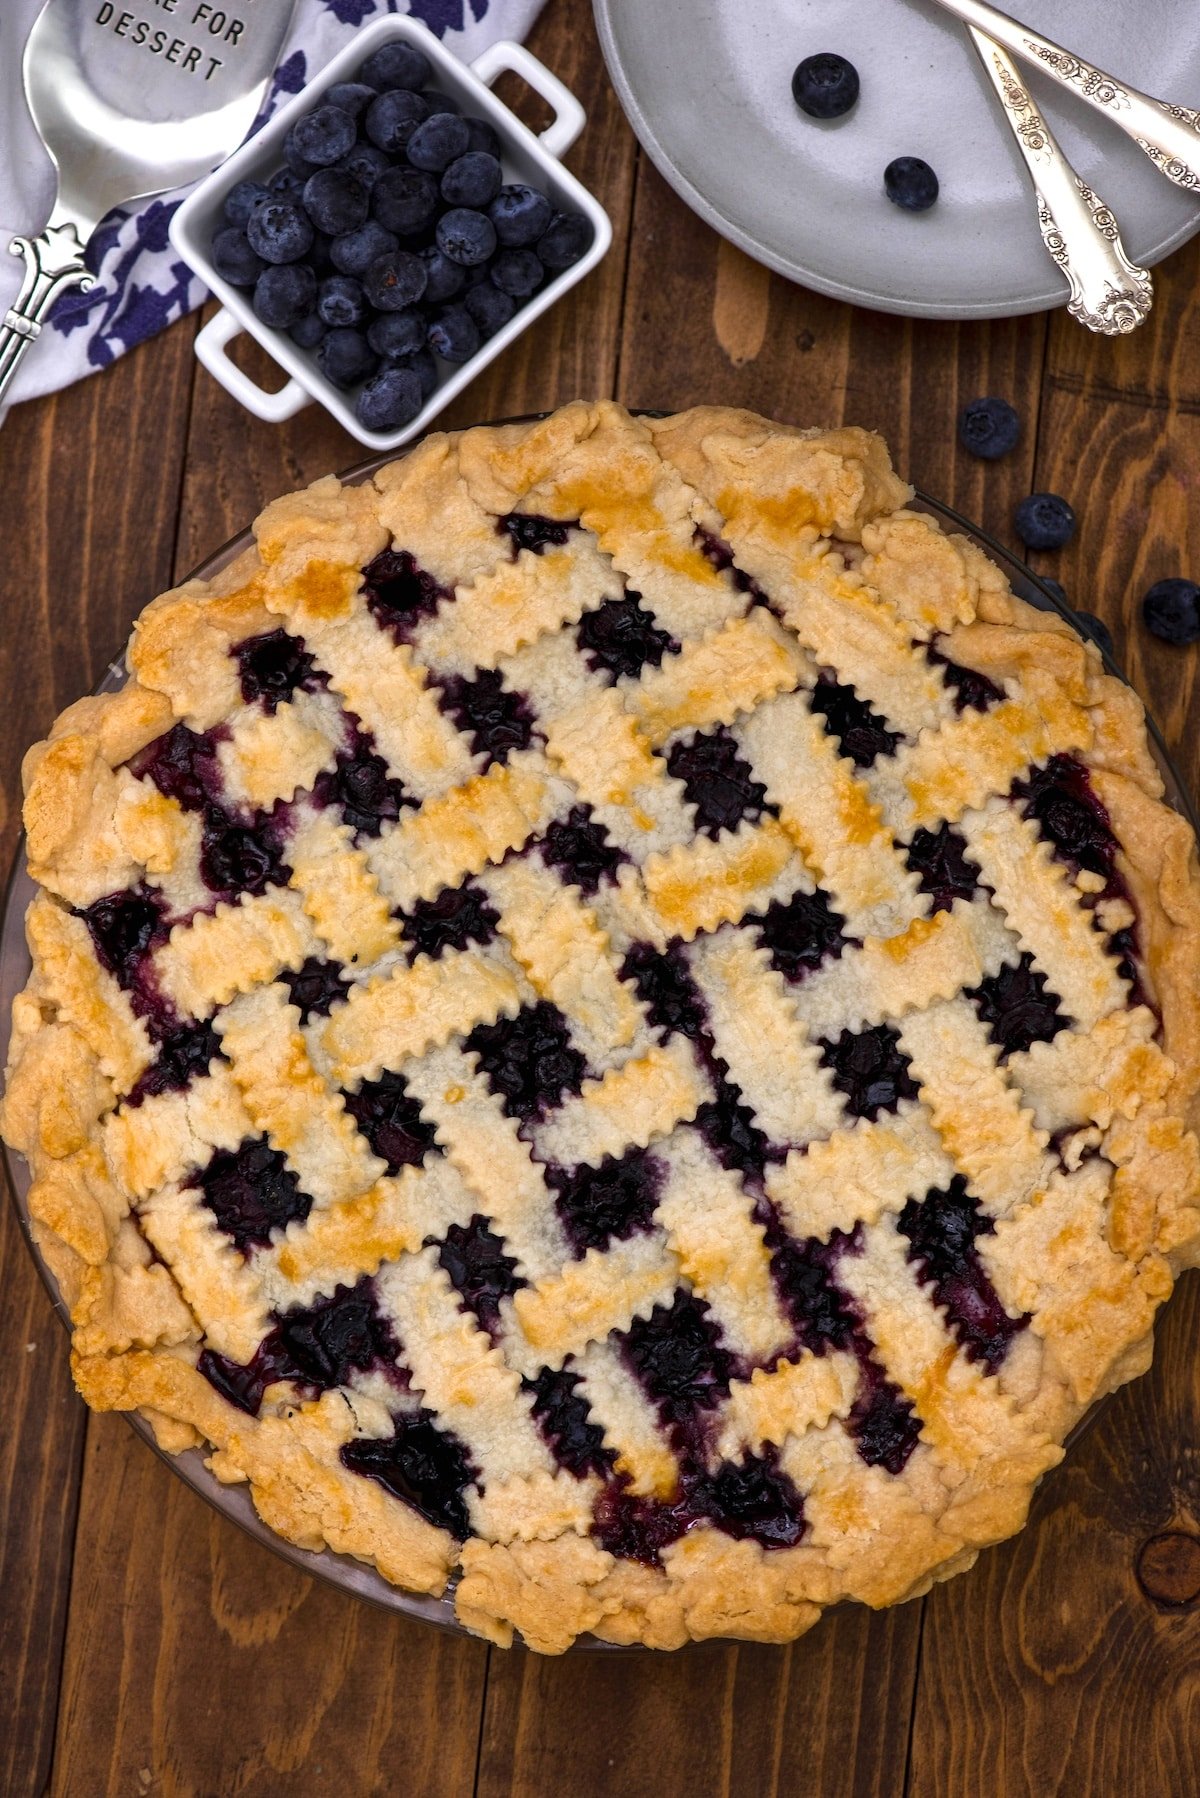
- Blueberry Pie is one of my favorites.
- Cherry Pie is a classic served with a lattice top!
- If you have extra pie crust you’ve cut away, use it to make pie crust cookies!
Expert Tips
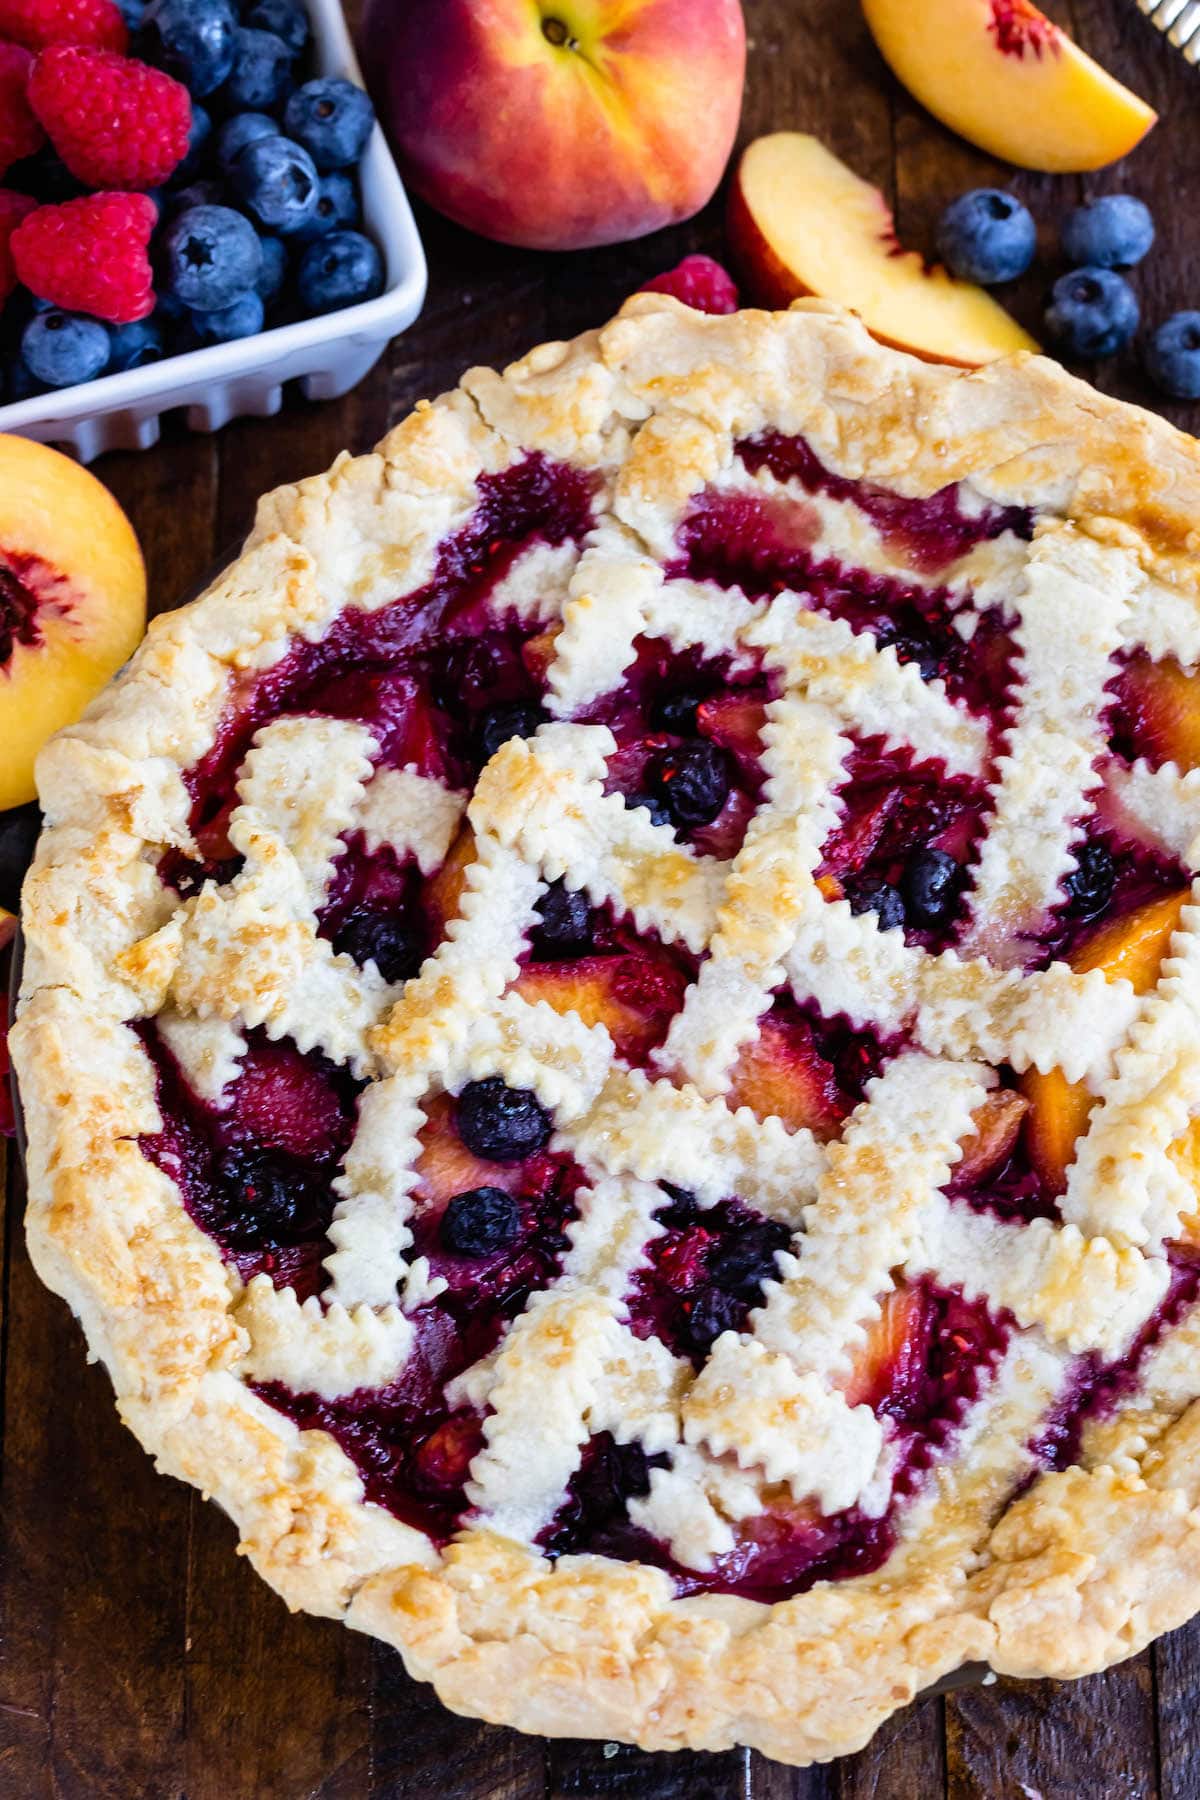
- For cutting the strips I like using a pastry wheel or pizza cutter. A flat edge cutter will give straight strips, a wavy edge cutter will give the jagged wavy edges shown.
- Once you have the lattice made, it’s good to brush it with egg wash. You don’t have to, but it makes for better browning. To make your egg wash, just whisk up your egg and use a pastry brush to lightly brush it all over the crust. Don’t have a pastry brush? Just use your fingers.
- I also add a bit of sanding sugar on top for a little sparkly crunch.
- Always bake fruit pies on a cookie sheet in case it spills over.
- Use a pie shield or strips of aluminum foil to protect your crust while it’s baking.
- Make a decorative pie crust that looks like a lattice using cookie cutters if you’re still worried about doing a lattice from scratch.
FAQ
As long as it’s a flat crust (typically refrigerated, not frozen in a pie shell) you can make a lattice with it.
A bottom crust in a pie plate should be at most 1/4-inch thick (usually between 1/8-inch and 1/4-inch) so it bakes all the way. A lattice should be a bit thicker – usually minimum 1/4-inch (a tiny bit thicker is fine, but not too much). The strips should be a little thicker so that they’re easier to handle and not too fragile.
You can use a sharp knife or pizza cutter to slice your strips of dough.
Lattice Pie Crust Recipe
Video
Ingredients
- 2 recipe all butter pie crust, (or use a refrigerated crust)
- 1 large egg
- Coarse sugar, optional
Instructions
- Roll one pie crust out to fit your pie plate. Place the crust in the pie, letting the edges overhang. Chill 30 minutes.
- Roll the second pie crust a bit thicker than you would for a bottom crust. I do at least 1/4-inch thick or just slightly thicker (you want to be able to handle the strips without them being too fragile).
- Fill pie as desired using your recipe.
- Remove rolled out crust from the refrigerator. Using a knife, pizza cutter, or pastry wheel, cut strips in the pie crust that are 1/2-inch to 1-inch thick. Use a ruler to help keep them straight, if needed.
- Pick up strips of the pie crust and lay them over the pie with gaps between that are the same width as the strips. Try to use the size strip that matches with the location on the pie (smaller strips close to the sides, longer strips in the middle).
- Fold over alternating strips and place a new strip perpendicular to the ones you already placed on the pie. Unfold the strips, then repeat using the alternating strips. Continue the basket weave until the pie is covered with the lattice.
- Brush the lattice crust with a bit of egg wash (just beat an egg with a fork like you’re making a scrambled egg and use a pastry brush or your fingers to lightly brush it over the crust). This is for browning. Sprinkle with coarse sugar, if desired.
- Trim edges and crimp as desired. Chill pie for 20-30 minutes, then bake according to recipe directions.
Notes
- Always bake your pie on a cookie sheet just in case of spill over.
- Always cover the edges of your pie with foil or a pie shield.
- If, during the lattice making process, your pie strips begin to get too warm from handling and/or start breaking, stop and place the strips in the freezer for 5 minutes to chill back up quickly.
Nutrition
Nutrition information is automatically calculated, so should only be used as an approximation.
© Crazy for Crust. Content and photographs are copyrighted. Sharing this post is much appreciated, but copying and pasting full recipes without authorization is strictly prohibited.
Did you try this recipe? Click here to rate the recipe below.


Great job! Beautiful pie.