This post may contain affiliate links. For more information, read my disclosure policy.
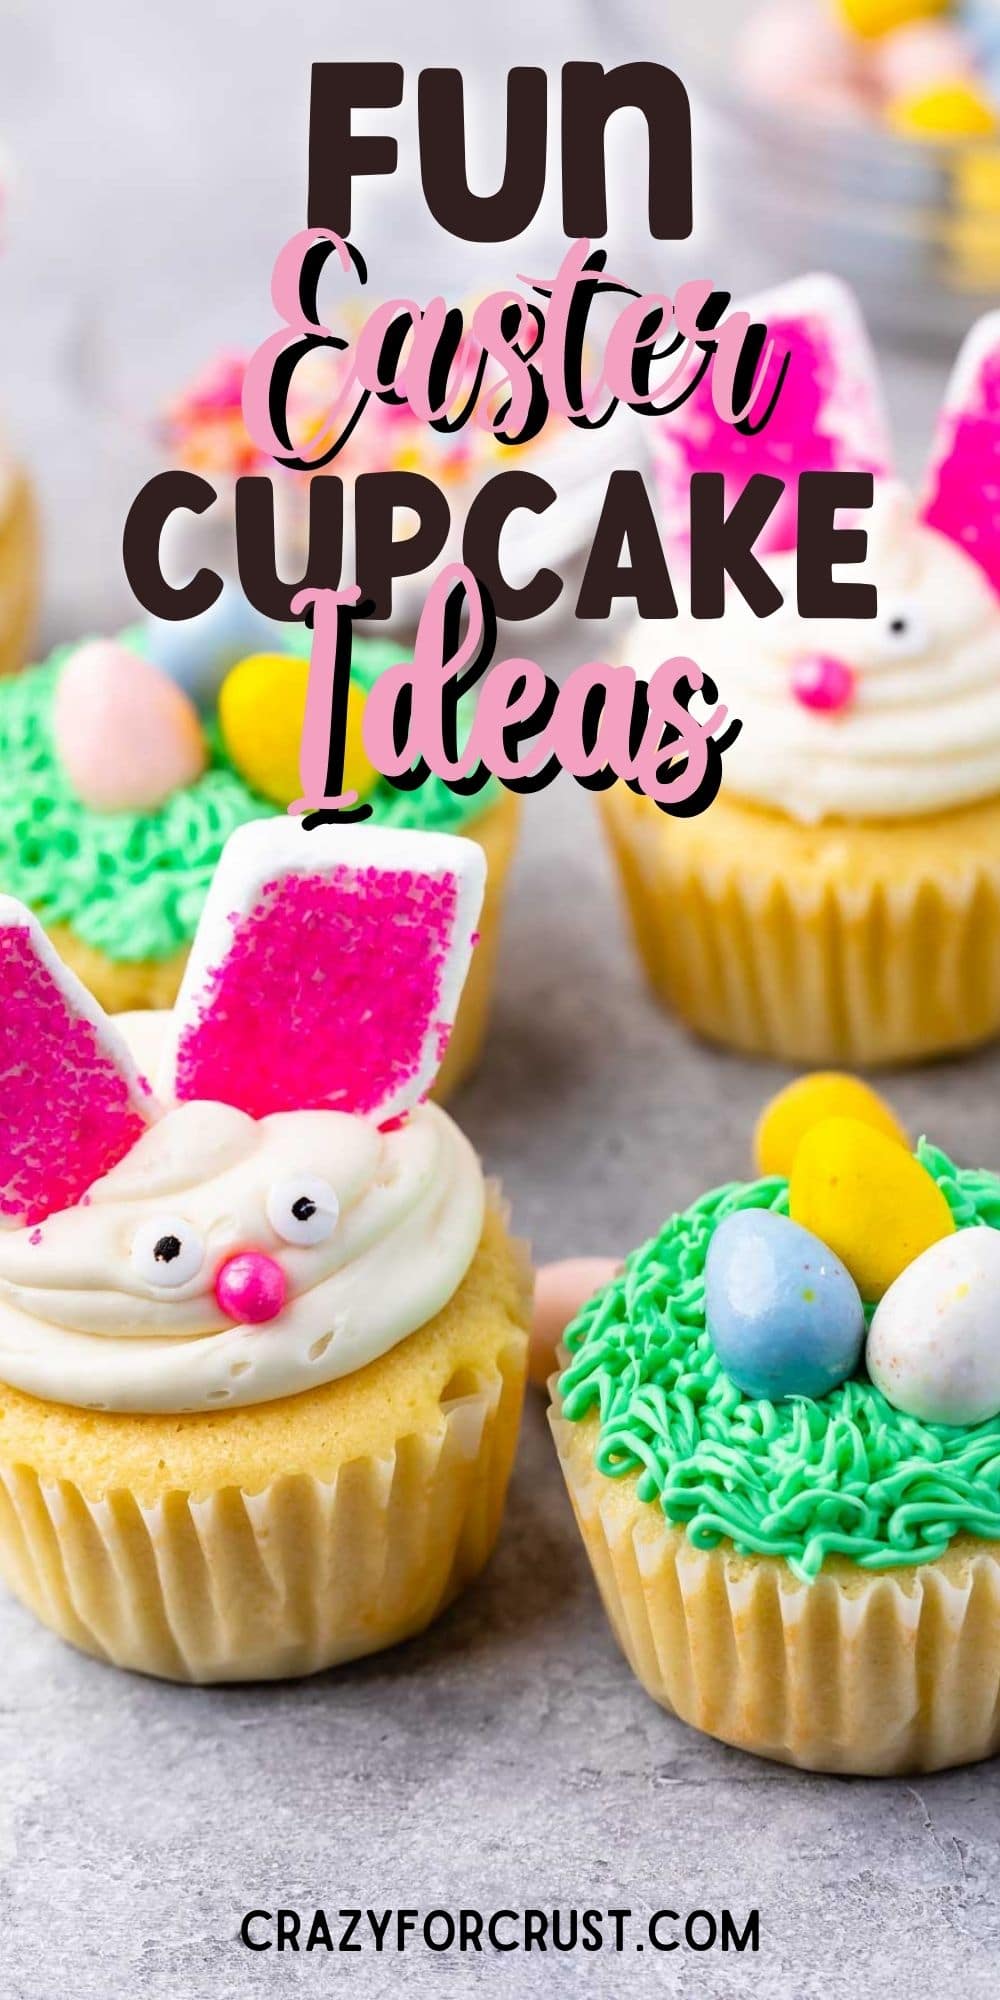
Looking for the best Easter cupcake ideas that are actually easy to make? These adorable Easter Cupcakes feature two simple designs: cute Bunny Cupcakes with marshmallow ears and Easter Nest Cupcakes with realistic grass frosting. Whether you need a treat for Easter brunch or a fun project for the kids, these step-by-step instructions will help you create bakery-style results using simple store-bought or homemade ingredients.
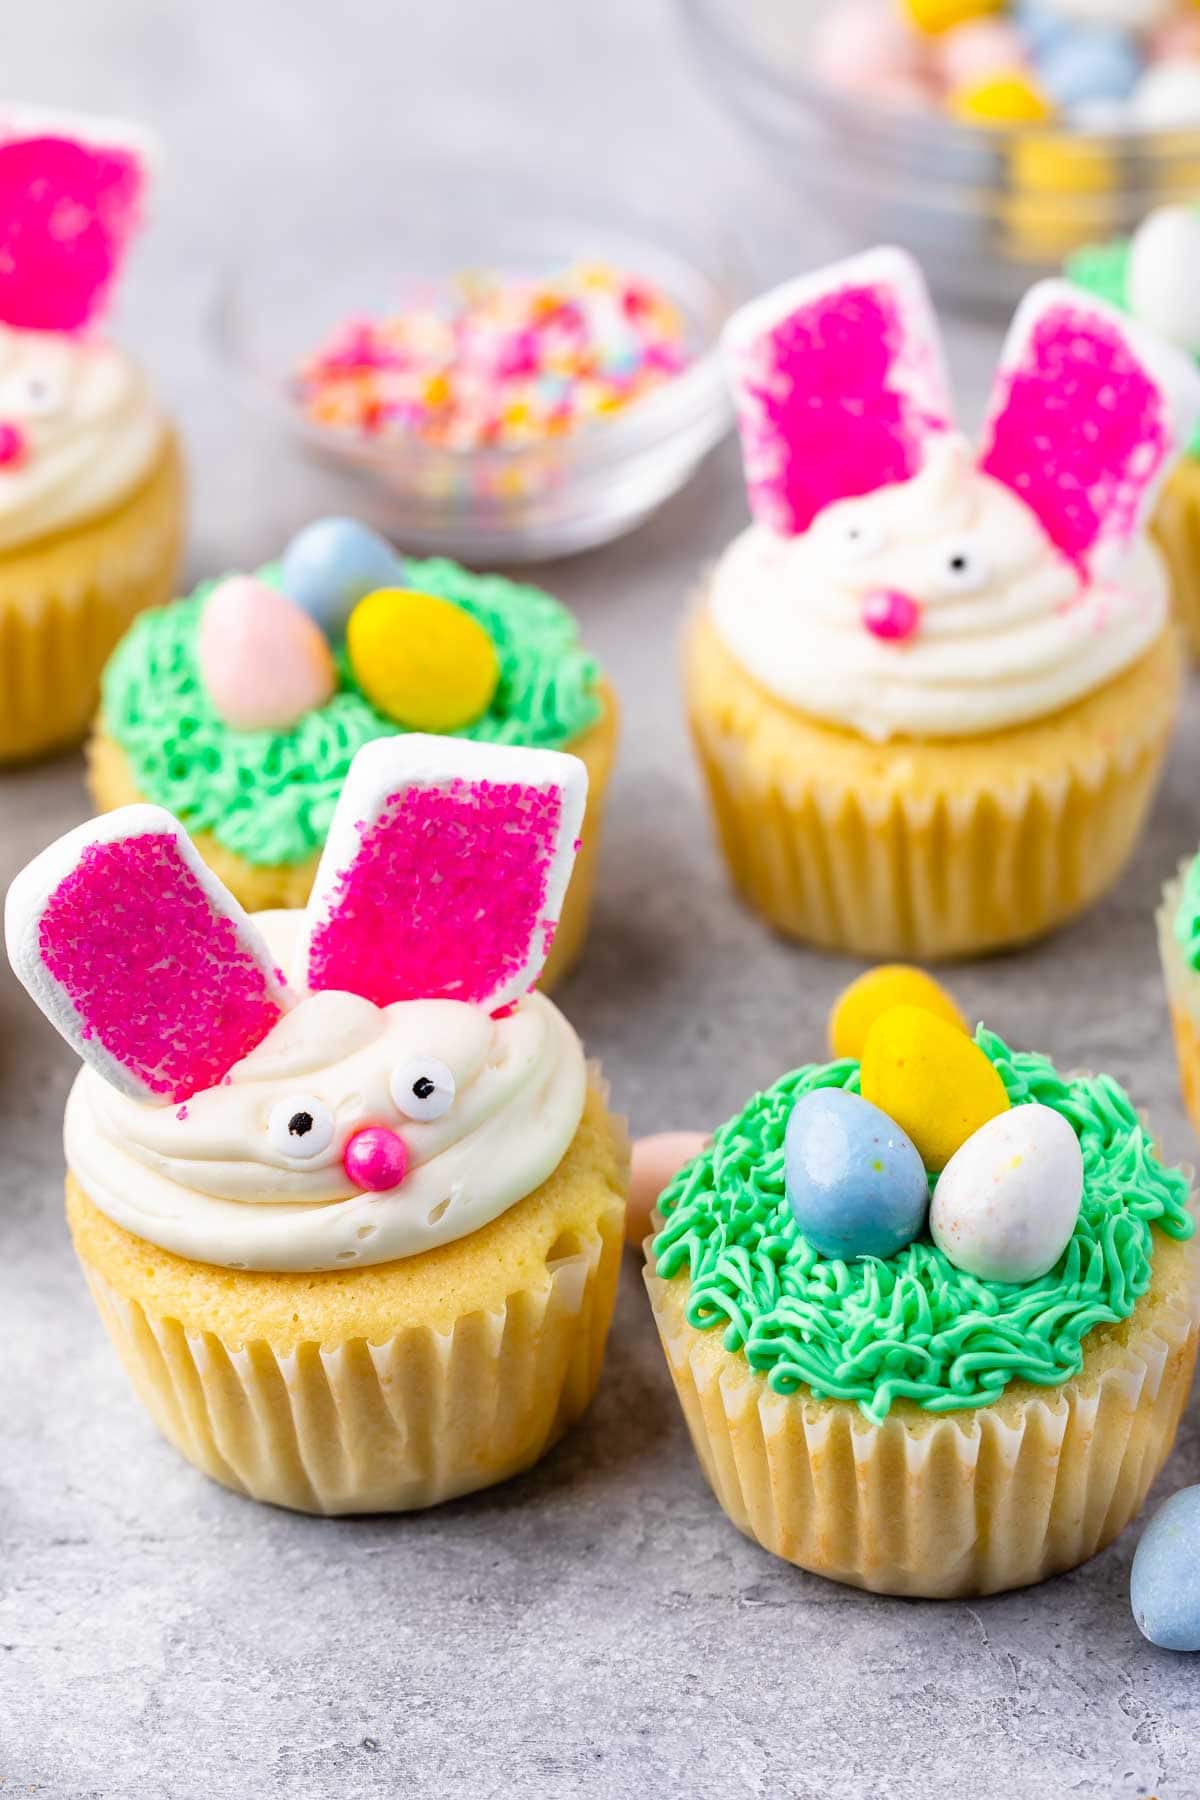
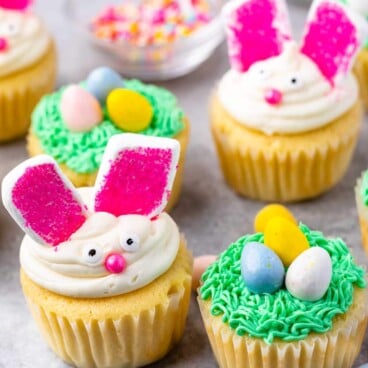
If I’m going to decorate cupcakes, I want it to be EASY, and I can promise these are just that. Bunny Ear Cupcakes and Easter Nest Cupcakes are a super fun treat that are also super easy – the kids and adults both will love them. There’s nothing complicated here – plus use your favorite cupcake recipe!
The secret to these easy Easter cupcakes is that they require zero professional cake decorating skills. To make the Bunny Ear Cupcakes, all you need is a pair of kitchen shears and some mini marshmallows. For the Easter Nest Cupcakes, we use a specific “grass tip” to create that perfect spring look in seconds. You can use my Perfect Yellow Cake recipe as a base or even a box mix to save time.
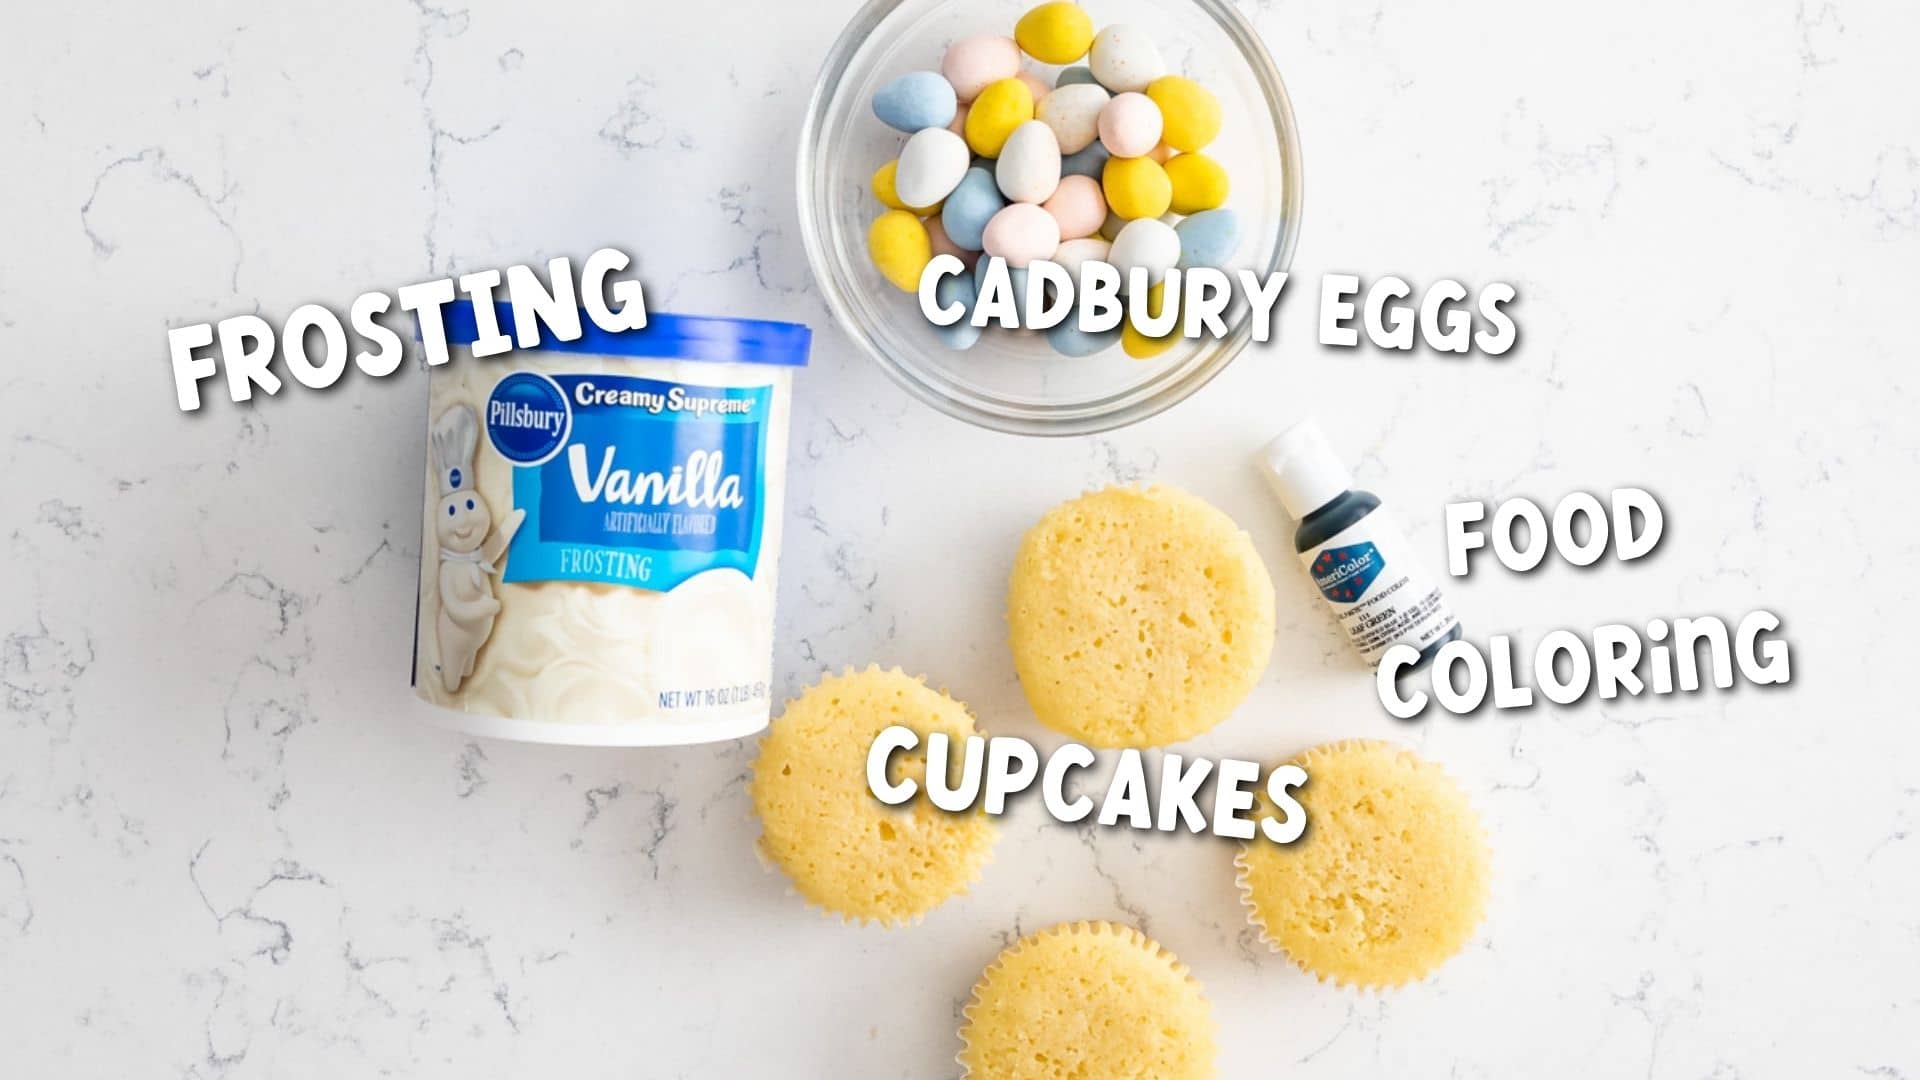
Ingredients for the Best Easter Cupcakes
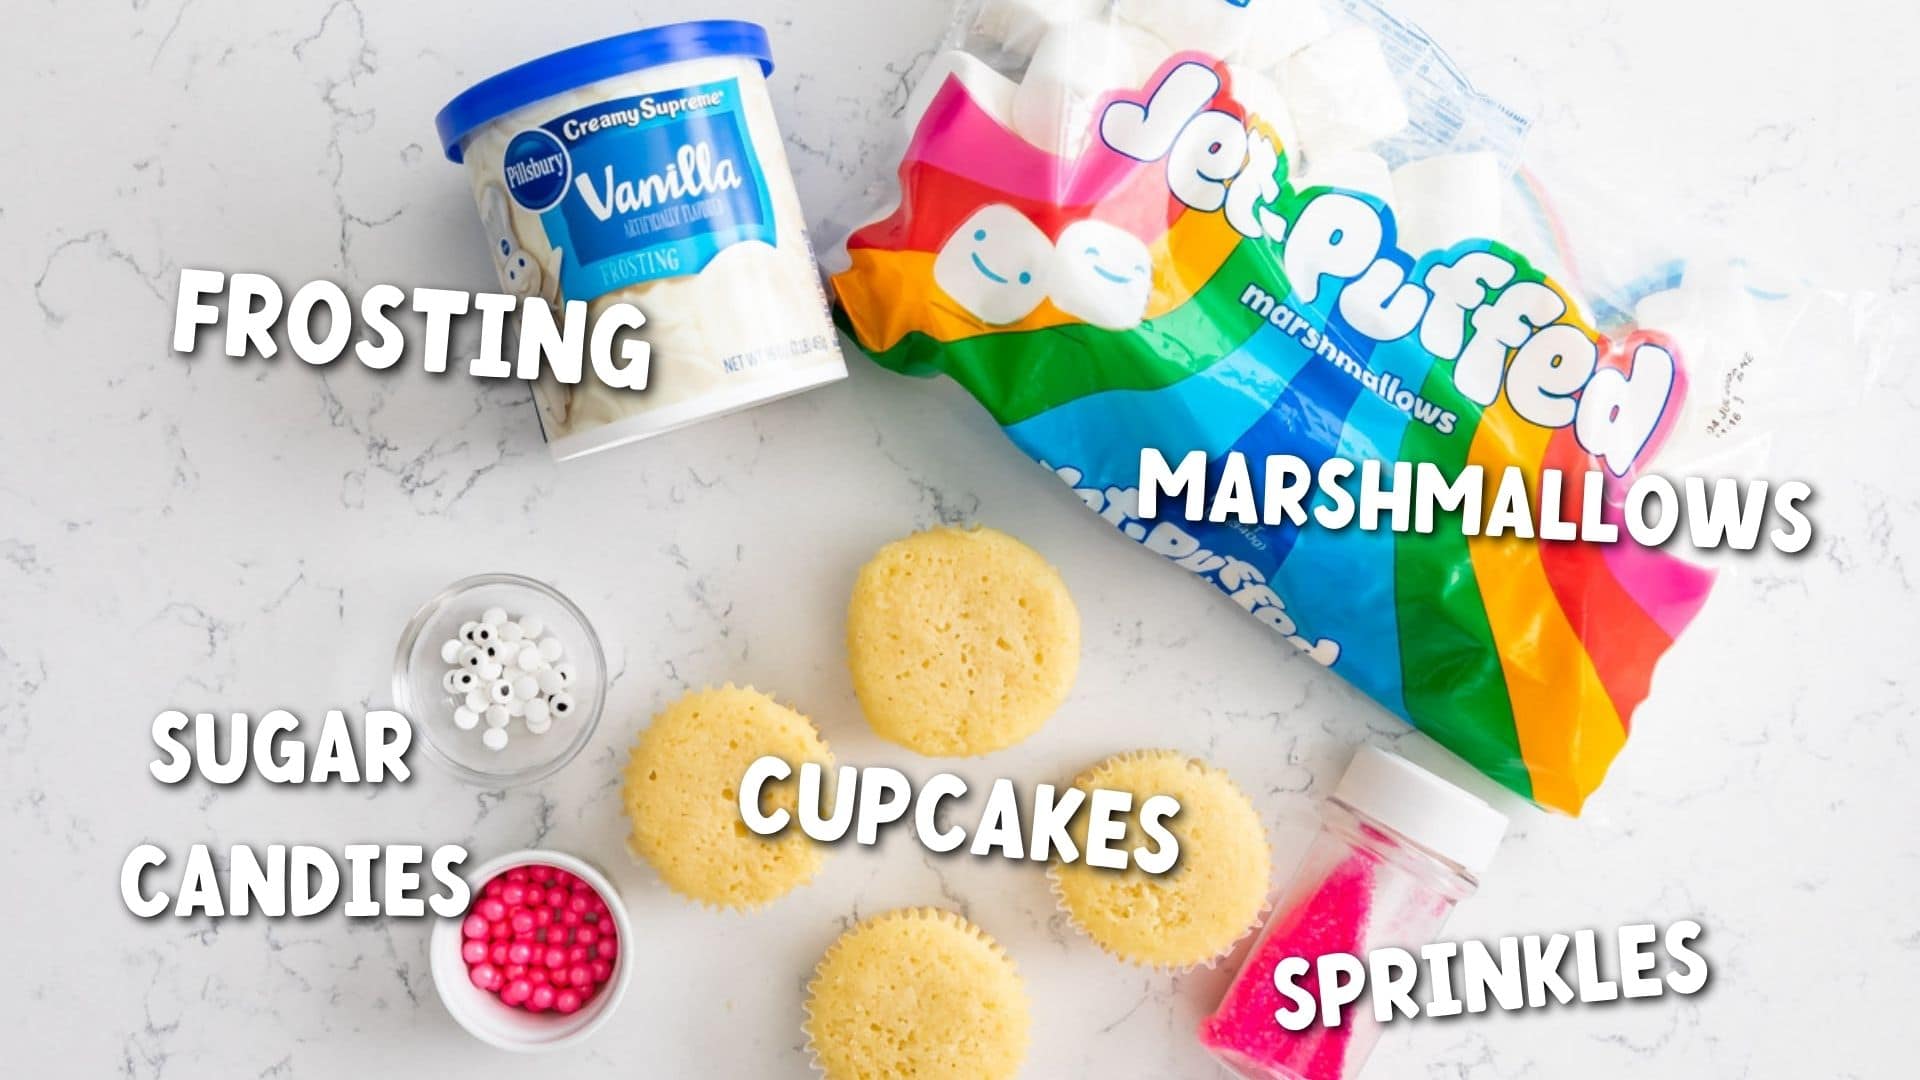
- You’ll need any flavor cupcakes (from scratch or from a box mix) and vanilla frosting. For ease, I recommend using a box mix for the cupcakes and making homemade frosting. Canned frosting is fine, but it may be too soft for piping and decorating (it doesn’t hold up as well as homemade).
- Want to make cupcakes from scratch? Try my perfect vanilla cupcakes or chocolate cupcakes!
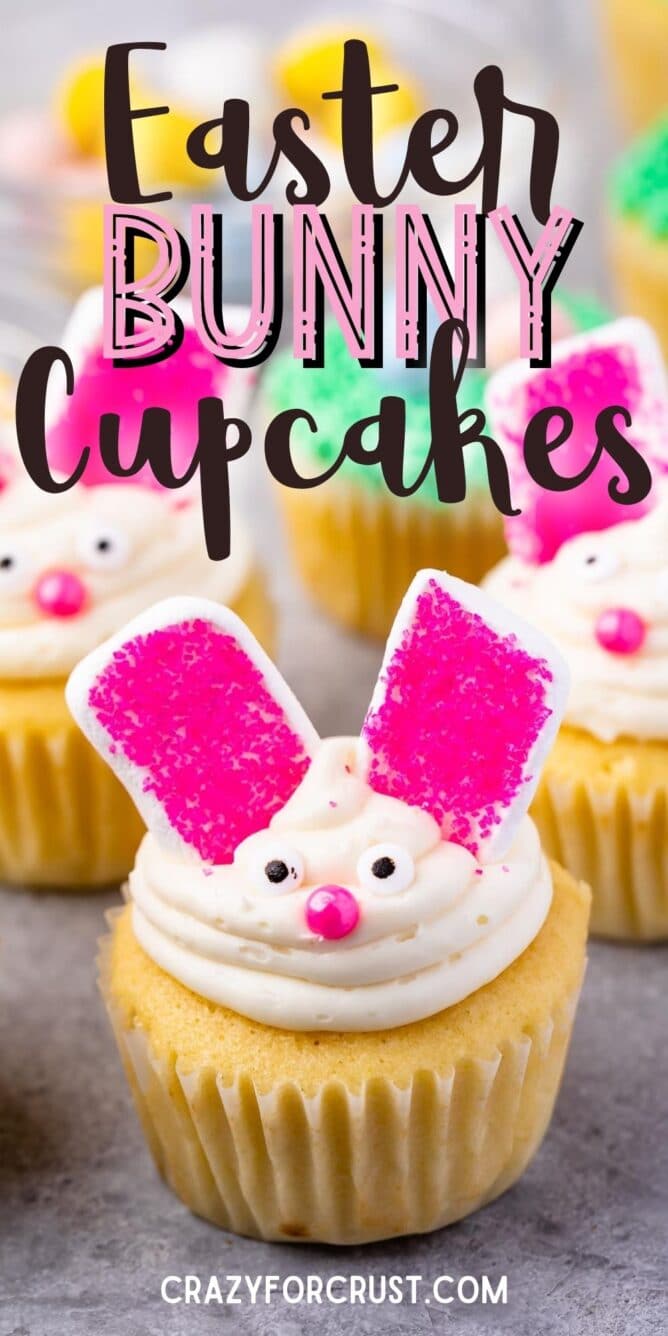
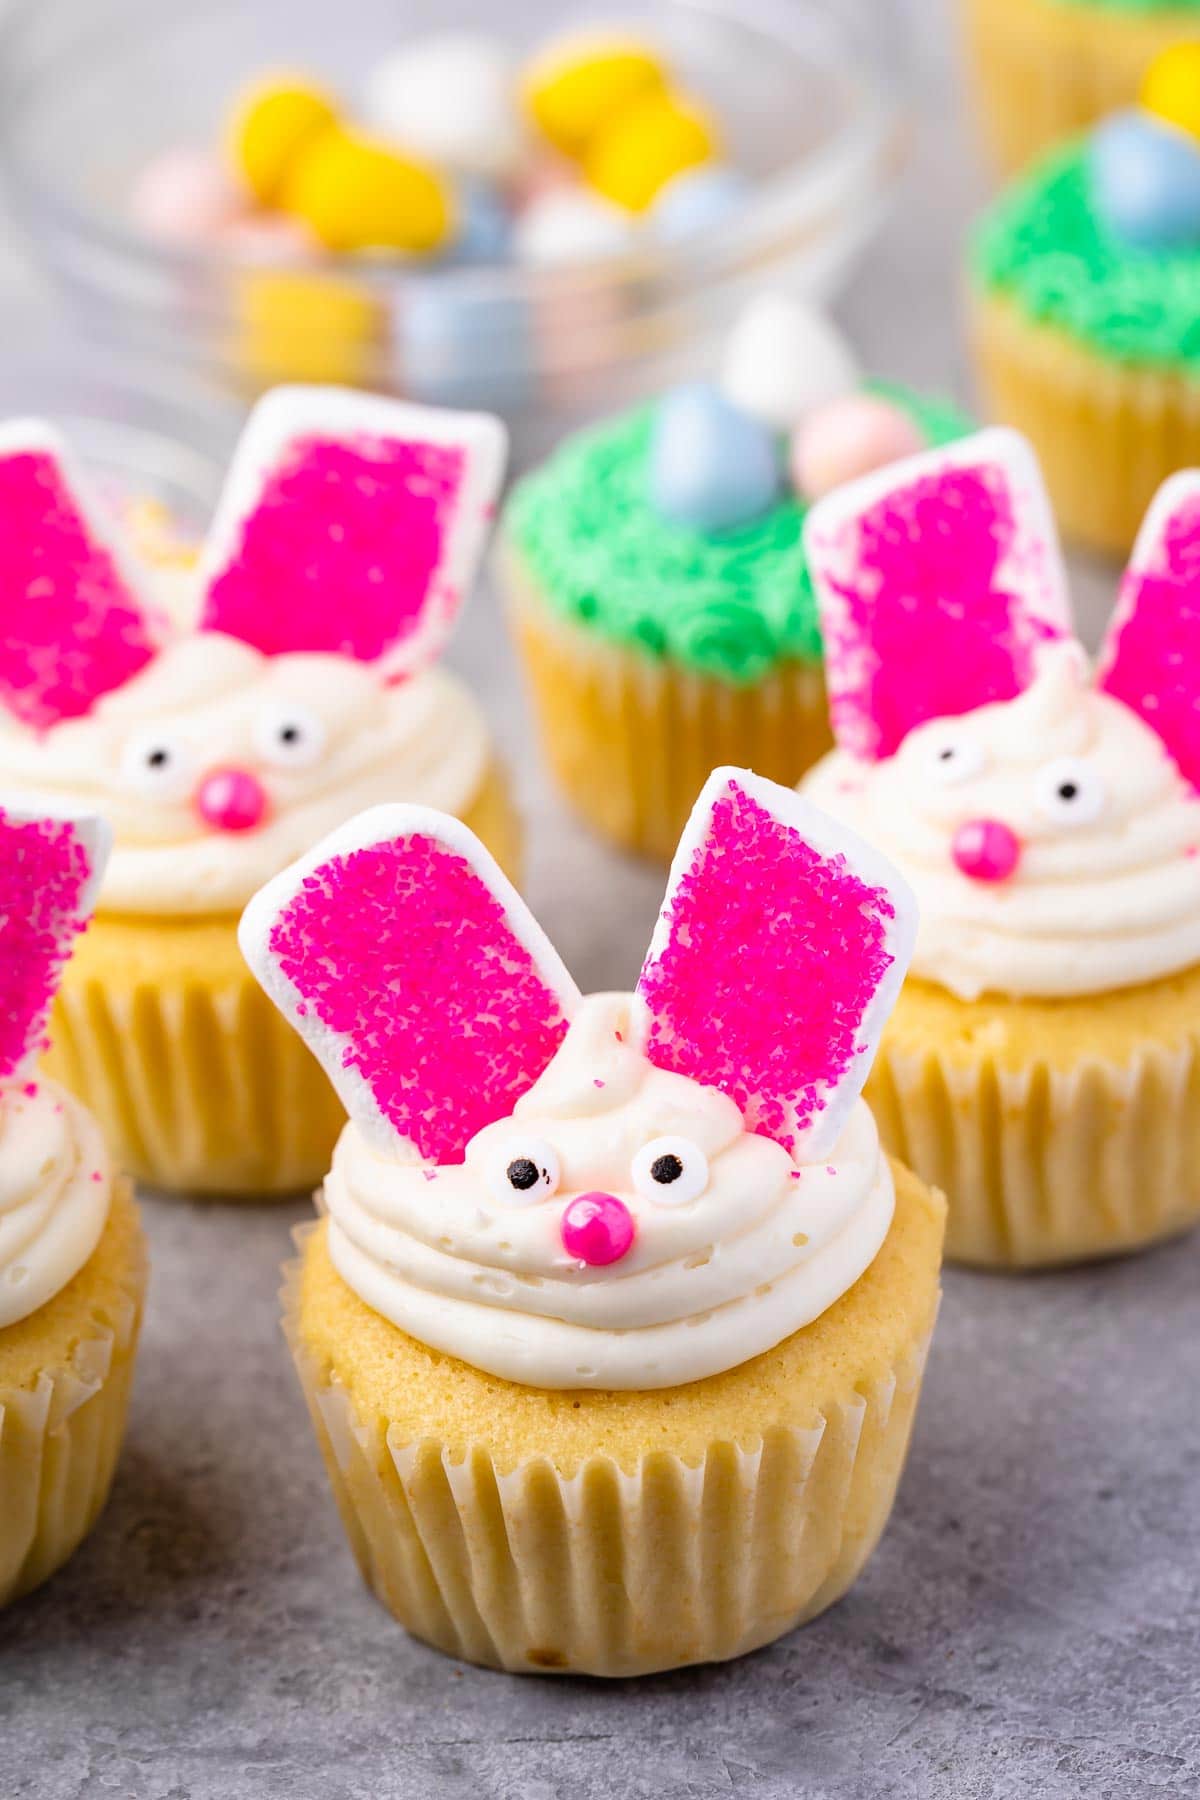
- For Bunny Cupcakes you will need large marshmallows, sanding sugar (a color, like pink or purple), black food coloring or a black gel frosting tube, and candies for the noses (large pearl sprinkles or pink jelly beans).
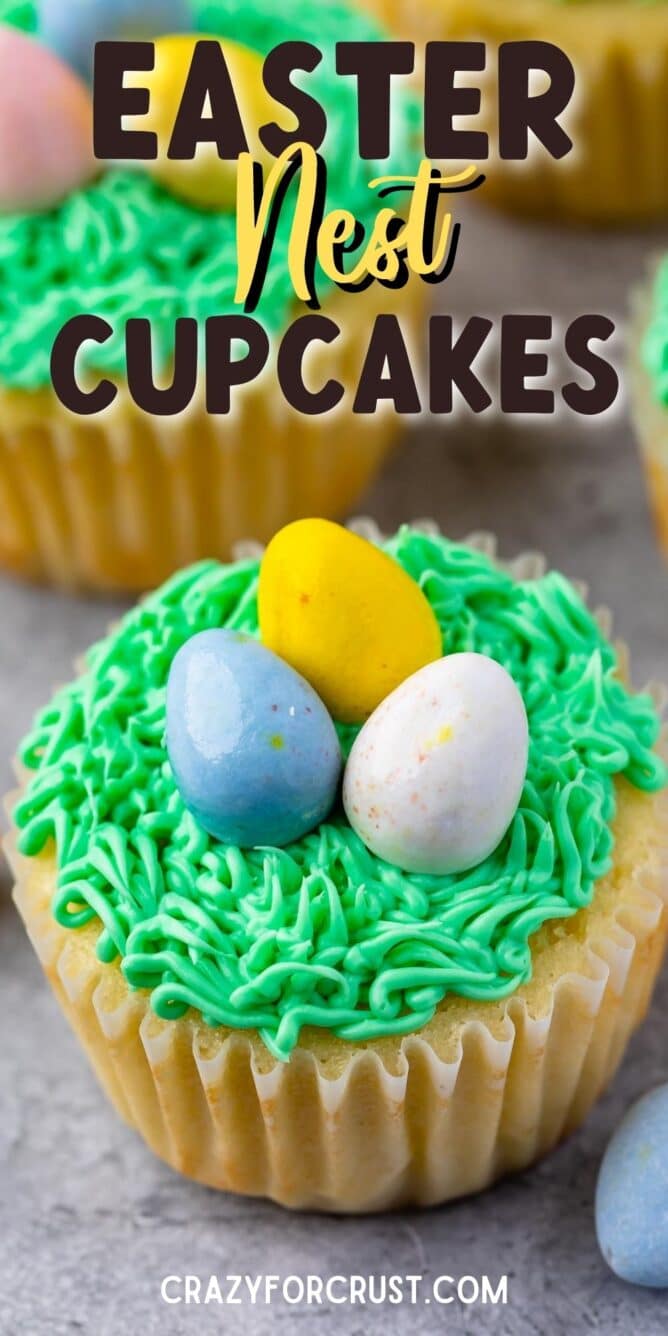
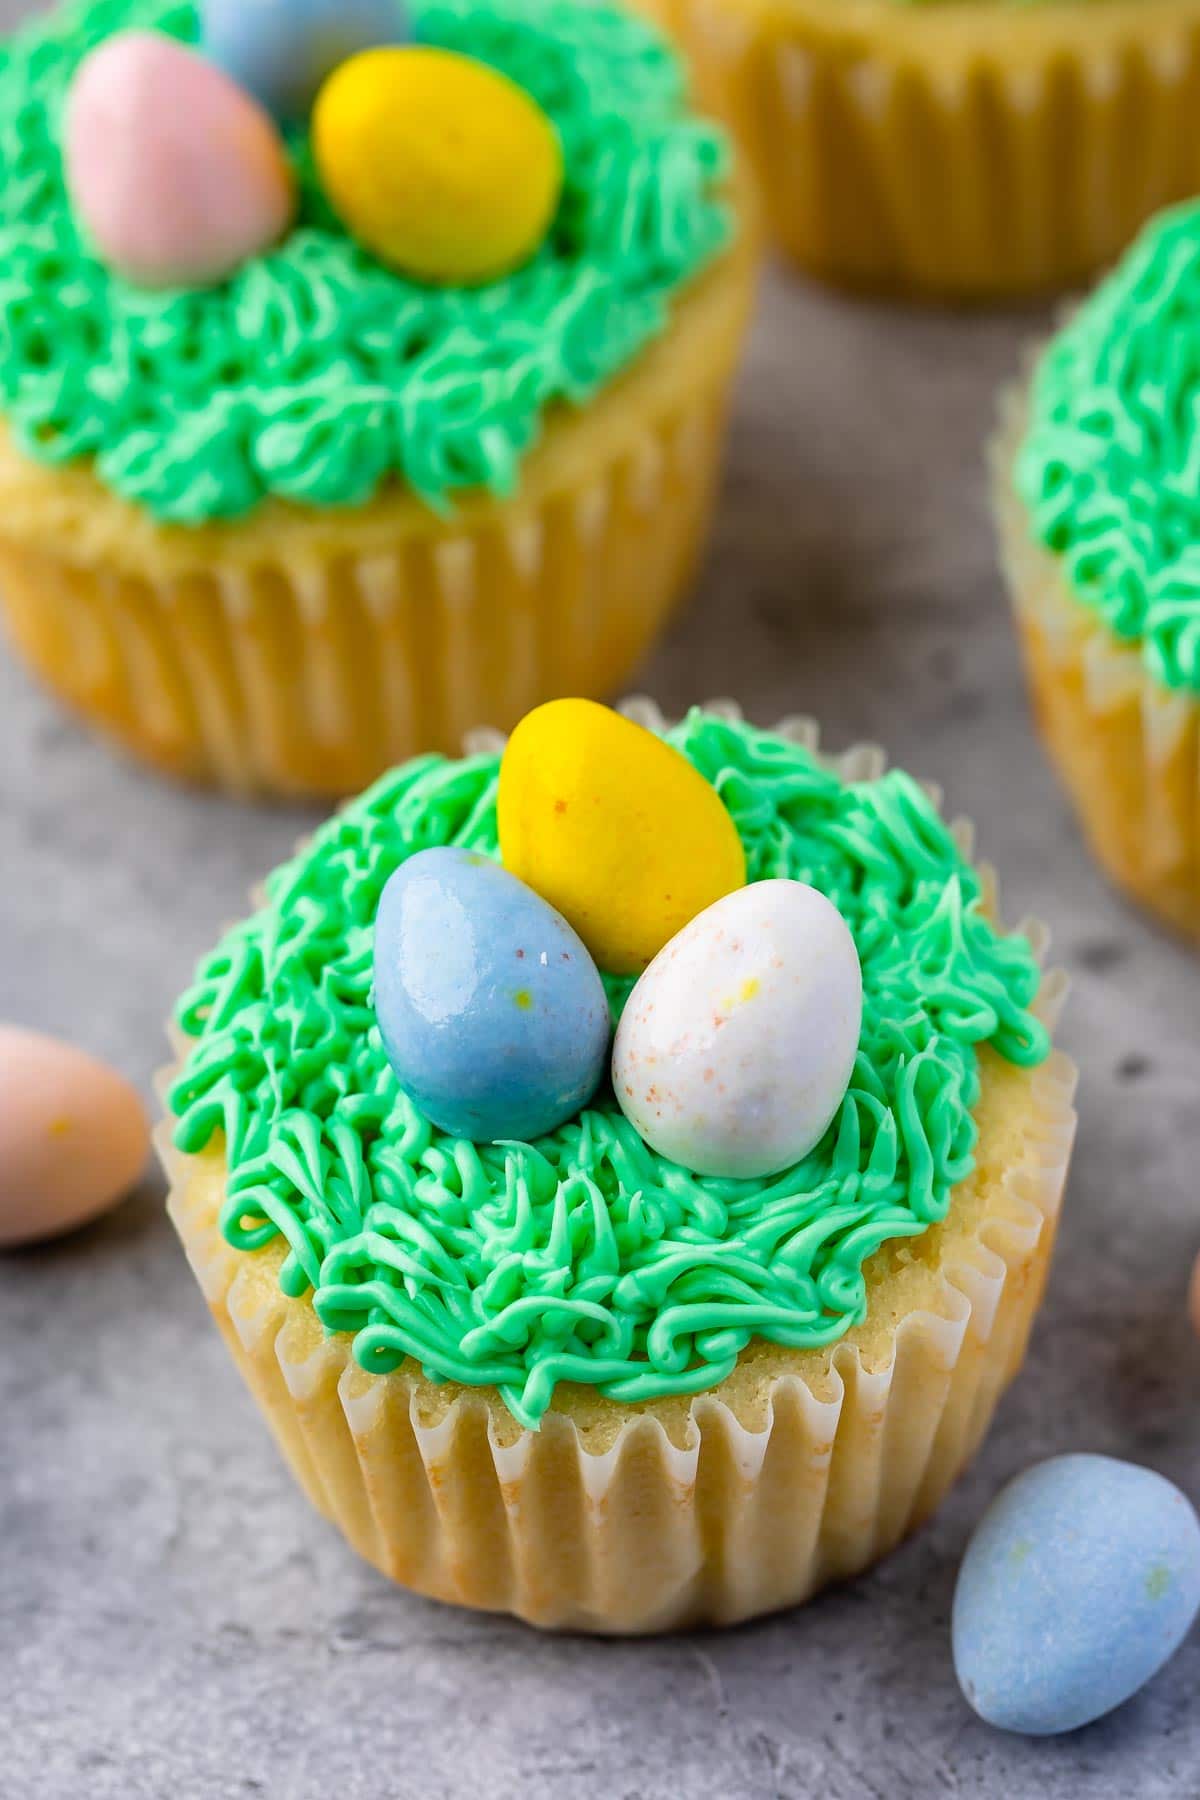
- For the Grass Nest Cupcakes you will need green food coloring and candy eggs. I recommend Cadbury Mini Eggs or Robin Eggs candy, not jelly beans. Jelly beans don’t look as much like eggs as the chocolate candies do.
SAVE THIS RECIPE
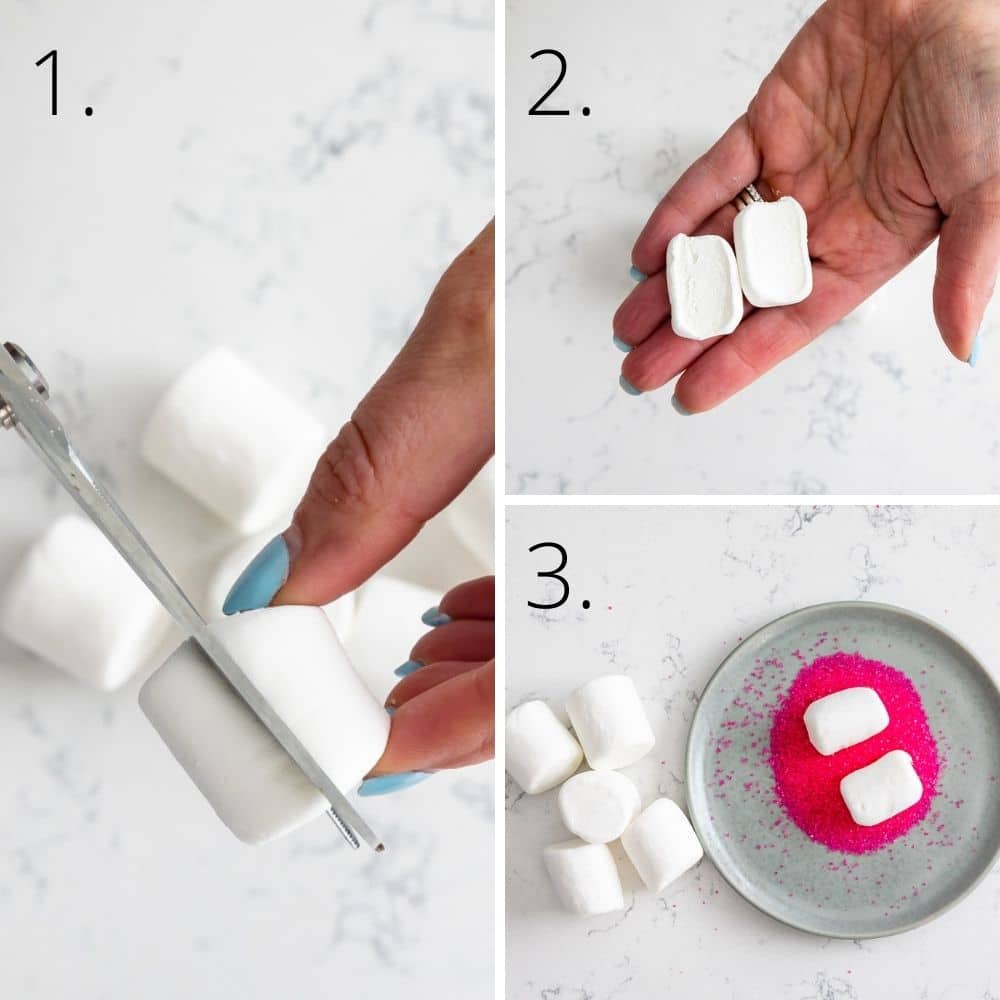
How to Make Marshmallow Bunny Ears
- When slicing your marshmallows, dip your scissors in a little bit of powdered sugar first to prevent sticking. This ensures a clean ear shape every time.
- You can cut the marshmallows vertically, as I did, or diagonally for pointy bunny ears.
- Dip the sticky part of the marshmallow in the sanding sugar.
How to Pipe Grass Frosting for Nests
- Tint the frosting with the green food coloring. Transfer the frosting to a piping bag fitted with a grass tip (Tip #233).
- For the grass frosting, make sure your buttercream is slightly stiff. If it’s too soft, the grass will lean over and lose its texture. If it feels warm, pop it in the fridge for 10 minutes before piping. (This is why I prefer homemade buttercream to canned for these cupcakes.)
- Pipe the frosting onto the cupcakes. Place the candy eggs onto the frosting, and you’re done.
Dorothy’s Expert Tips
- For the Easter bunny cupcakes, be sure to use regular-sized marshmallows – not jumbo ones or mini marshmallows.
- When you tint the frosting for the grass cupcakes, start with a bit of food coloring and then add more to darken the color.
- If you don’t have piping bags or tips, you can use a ziplock bag to pipe your frosting. Place the frosting in the bag and snip off one corner. For the grass frosting, snip a smaller hole – for the bunny ones, make it a little bigger.
- You can bake the cupcakes a day in advance and let them cool. Be sure to bake them in cupcake liners! Store them in an airtight container overnight and frost them the next day.
- Be sure to check out my easy Easter Cookies too – they go great with cupcakes.
Easter Cupcakes Recipe
Video
Ingredients
- 24 vanilla cupcakes, baked and cooled
- 1 recipe vanilla buttercream frosting, (or two cans of icing)
Bunny Cupcakes
- 24 regular size marshmallows
- Pink sugar
- Candy Eyes
- Pink jelly beans or sprinkles
Easter Egg Cupcakes
- Green food coloring
- Candy Eggs
Instructions
Bunny Cupcakes
- Slice each marshmallow in half and dip the sticky side in pink sugar.
- Place white frosting in a piping bag fit with an open round tip. Pipe frosting.
- Top with 2 marshmallow halves, 2 candy eyes and a pink sprinkle nose.
Easter Egg Cupcakes
- Tint frosting green. Fit a piping bag with a grass tip and fill with frosting.
- Pipe grass on cupcake, top with candy eggs.
- Store cupcakes in refrigerator for up to 3 days (the marshmallows will get hard after 1 day).
Notes
- For the Easter bunny cupcakes, be sure to use regular-sized marshmallows – not jumbo ones or mini marshmallows.
- When you tint the frosting for the grass cupcakes, start with a bit of food coloring and then add more to darken the color.
- If you don’t have piping bags or tips, you can use a ziplock bag to pipe your frosting. Place the frosting in the bag and snip off one corner. For the grass frosting, snip a smaller hole – for the bunny ones, make it a little bigger.
- You can bake the cupcakes a day in advance and let them cool. Store them in an airtight container overnight and frost them the next day.
Nutrition
Nutrition information is automatically calculated, so should only be used as an approximation.
© Crazy for Crust. Content and photographs are copyrighted. Sharing this post is much appreciated, but copying and pasting full recipes without authorization is strictly prohibited.
Did you try this recipe? Click here to rate the recipe below.
FAQs
Cover the cupcakes and keep them at room temperature for three days. Or, you can keep them in the refrigerator. If you don’t want to risk messing up the frosting, it’s best to keep them in an airtight container with a lid. It should be deep enough so the cupcakes are not touching the top of the cover.
I wouldn’t freeze these cupcakes after decorating, but you can freeze the cupcakes and frosting separately for up to 2 months.
Slice a regular marshmallow in half diagonally and dip the sticky side into pink sanding sugar.
Use a Wilton #233 (grass tip). It has multiple small holes that create several strands of grass with one squeeze.
Yes. You can bake the cupcakes a day early. However, wait to add the marshmallow ears until the day of serving, as they can become firm and stale if refrigerated for too long.
If you don’t have one, you can use a Ziploc bag with the corner snipped off, though the “grass” effect requires a specific tip for best results.