This post may contain affiliate links. For more information, read my disclosure policy.
It’s here!! It’s finally here! My kitchen is finally done! And today I’m going to give you a full tour and some design tips for the perfect white kitchen!
Want to see how it looks? I know you do!! Let’s get going, because I can’t wait to share it all with you.
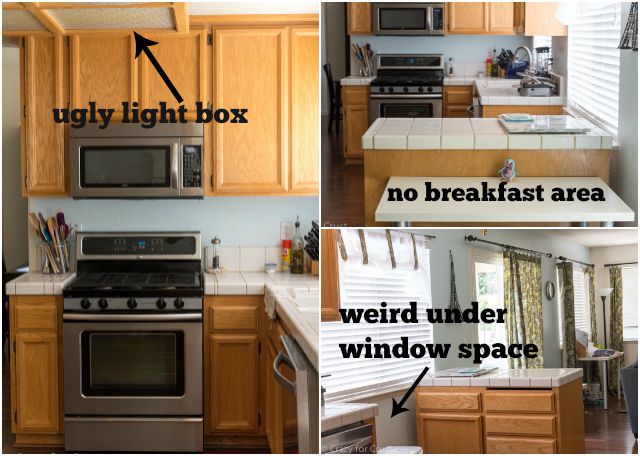
First, let’s remember how it looked before. In a word, ugly. It was not functional for my needs…and did I mention it was outdated and ugly?
Thanks to the fast and professional work of KitchenMart only 4 weeks after demo I have the kitchen of my dreams. I keep pinching myself: is this really real? Is this my kitchen? How am I allowed to have something so nice??
Ready? *drumroll*
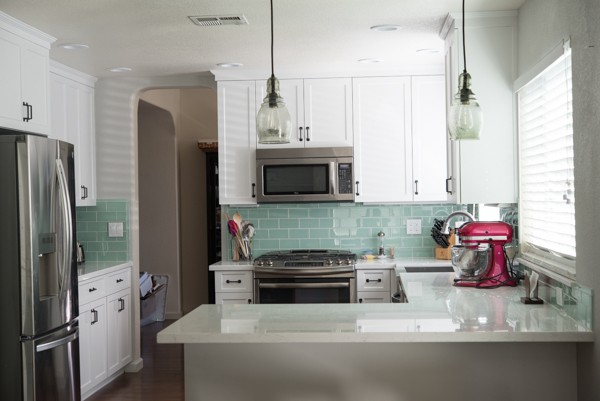
I cannot even tell you how excited I am about this kitchen. It’s just so pretty!! I knew it would look better but I had no idea how much space I would gain. We couldn’t change the footprint or make it any bigger but we made just a few simple changes and now my small kitchen seems so much larger.
(Links to all finishes used in the kitchen are linked at the bottom of the post in case you want them for yourself.)
One of my main goals in this kitchen was to give myself more work space. Whenever I had a heavy baking day I felt like I was constantly running out of counter space. I couldn’t have all my ingredients out and be running two mixers and have food cooling at the same time. And there was no way two of us could work in there at the same time.
You can see in the “before” shot above that we had a weird space under the window. There was no counter there and it was totally wasted space. We also had no eating area in the kitchen; Jordan ate her breakfast at a cheap Ikea table in front of the island.
My #1 goal with this kitchen was to add counters and cabinets all along that wall. As a result? I have an uninterrupted space from my sink all the way down to the peninsula. It’s several feet of open area that I can use for baking and photo shoots. And we added an overhang so that we can sit in the kitchen for meals.
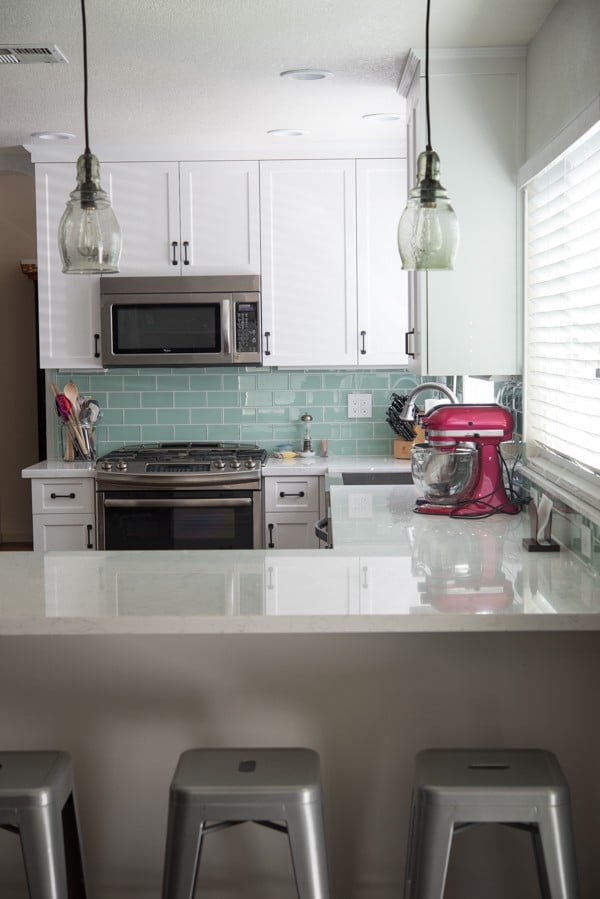
That area, where we added space, is now my baking area. I can have all of my ingredients lined up, be using both mixers, and have bowls all over the place and not even notice it.
I decided to put all of my baking items in one area. That’s a big tip for you if you’re designing a kitchen – group all your items in one area for easy access. For me, that’s baking. Instead of having to go all over the kitchen for my bowls, measuring cups, and mixers, it’s all in one place, all within an arms reach.
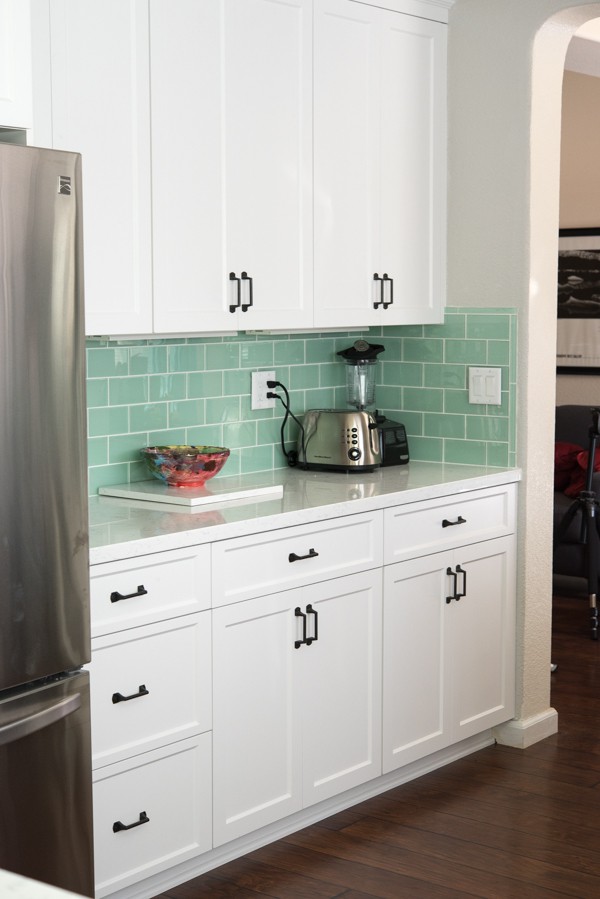
The other BIG move we made was the refrigerator. Before, as you can see in the image above, it was in the middle of this wall. If the refrigerator door was open you couldn’t walk into the dining room, and we had two small counters on either side, not enough to really do anything on either one. We moved the refrigerator a few feet and now I have one long cabinet/countertop run to the dining room door.
You guys. This space is amazing. I have no words.
I put all my “everyday” appliances on that wall. The mugs are now with the coffee maker so I’m not trekking across the kitchen for a mug. Same goes for the blender and the glasses, and I’m not in danger of electrocuting myself with my toaster (it used to be right next to the sink).
I have so much counter space now I rarely run out, which is something I NEVER thought I’d say in that kitchen.
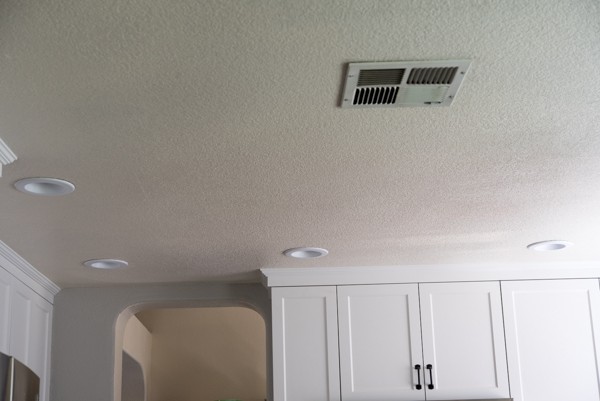
Another thing that makes the kitchen look bigger? That 1990s style lightbox is GONE. In it’s place, can lights. They make a huge difference. If you’ve ever wondered if your kitchen would look better without that light box, stop wondering and call the electrician.
Let’s talk about storage.
Because we couldn’t add much space to the kitchen I was figuring we wouldn’t get more cabinet space. I figured I’d have the same amount and still have to go to the garage for most of my stuff. After all, my cabinets already went to the ceiling and so much more fits in cabinets without pull-out drawers, right?
I was wrong.
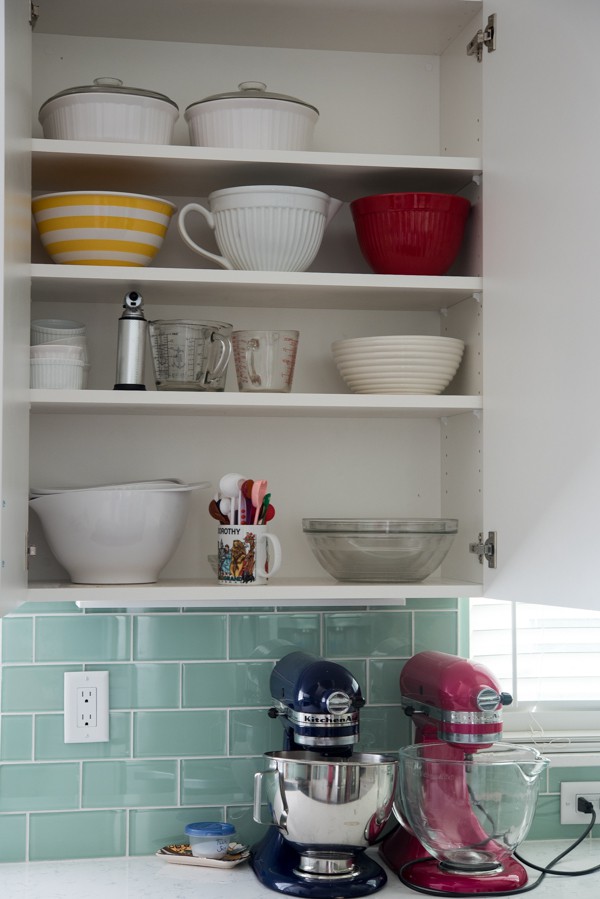
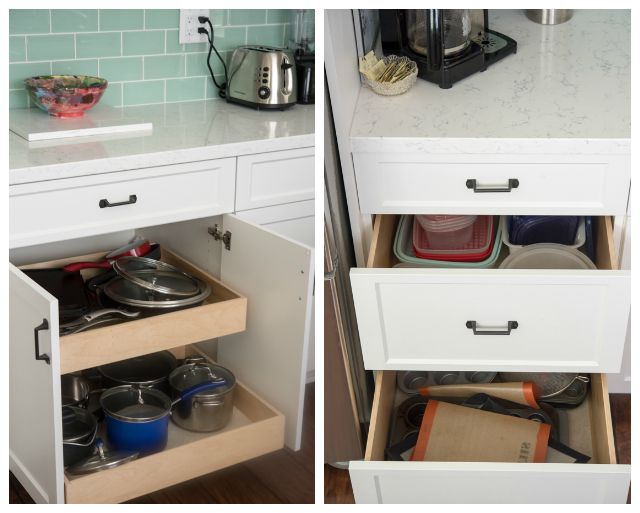
While I did purge as I was cleaning out the kitchen, I put everything back and I still have empty shelves. Each upper cabinet has 4 shelves now instead of 3, which makes a HUGE difference. Also? Drawers were sent from heaven to make my life easier, in case you were wondering.
My old kitchen had just a few drawers. The silverware was practically in the family room and every other drawer was STUFFED and overflowing. I haven’t even filled all the drawers I have now!
I didn’t think I’d like putting everyday stuff in drawers that I was used to putting in cabinets, like pans and tupperware. But I was wrong. The muffin pans lay flat and are easily accessible. The tupperware is now below me so it’s not cascading down over my shoulders when I reach for a container. I’m also loving the pull out pot shelves. It’s forcing me to put things back orderly instead of just throwing it all back into the too-full cabinet while muttering expletives.
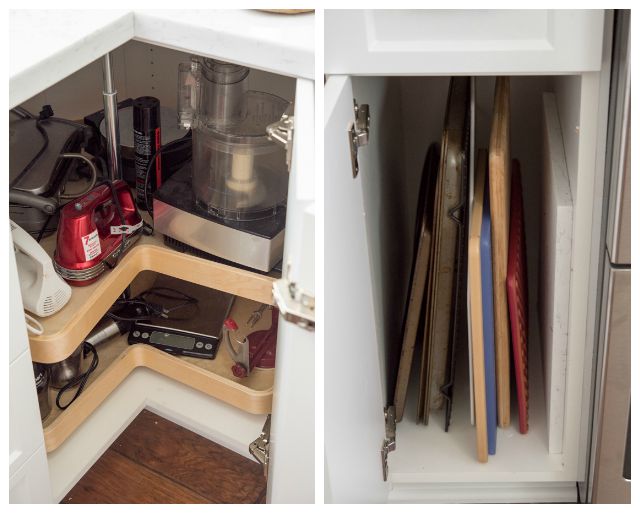
If you have a corner cabinet, spring for a lazy susan. All of the items I use a lot but don’t need on the counter are in my corner cabinet now. My favorite cabinet? The one next to the stove for my cookie sheets and cutting boards. No more dusty top-of-the-refrigerator cutting boards!
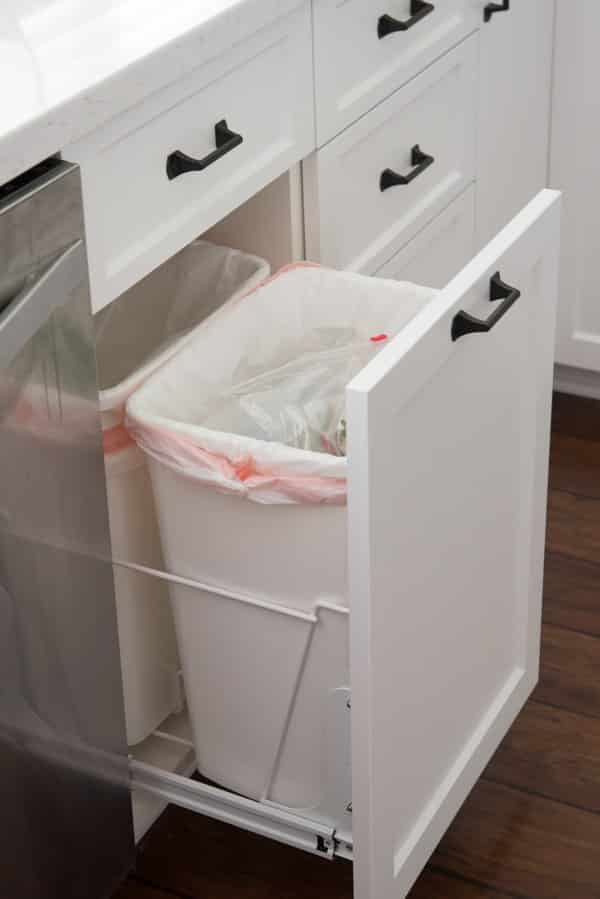
I never knew how excited I’d be about garbage.
In all seriousness, this is one of my favorite parts of the kitchen. Mel’s too; he was worried the trash would take up too much space and didn’t see the need for a trash cabinet. Now we can’t live without it!
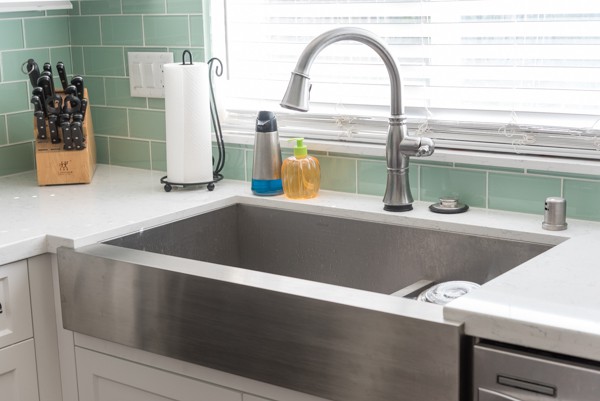
My sink. Oh, my sink. It’s almost too big, if that’s possible. Pot stacking just got real – I’d take gold at the Olympics. (And I kept my Delta touch faucet – love that thing!)
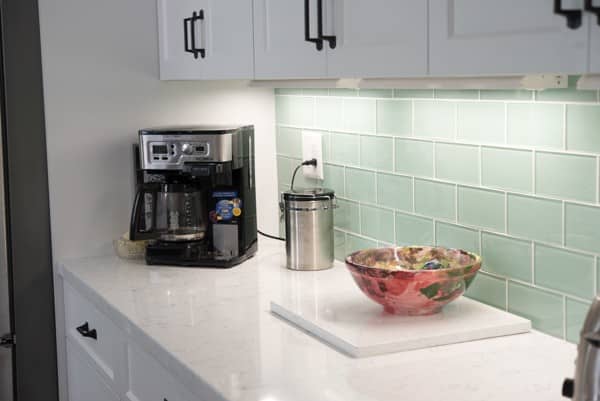
One other thing about lighting – I am loving under cabinet lights. I didn’t want it at first because it was an added expense I didn’t think we’d use, but often they’re the only lights I use. And they highlight my pretty backsplash.
I knew going into this remodel that I wanted an all white kitchen. In fact, the entire kitchen was modeled after this pin. I wanted simple white cabinets and counters that looked like marble. I didn’t actually want marble, because I knew I would ruin them. My amazing designer, Lianne, introduced me to DuPont Zodiaq Quartz and I fell in love with the Coarse Carrara. It really does look like marble!
While I kind of wanted white backsplash too, I knew the kitchen needed some color and a statement. I really wanted the tile in that pin I linked above, but it was discontinued. When I saw this glass Lucente Cascade glass subway tile, I fell in love. And I really do think it made the kitchen.
I had an amazing experience going through this remodel. It was hard – aren’t all remodels? – but the folks at KitchenMart are really amazing. They were professional, prompt, fast, and did great work. I feel like they were part of the family by the end of the whole thing. Also? They totally loved on Ginger. (Love my dog, I love you.)
Connect with Kitchen Mart: Web / Facebook / Twitter / Houzz
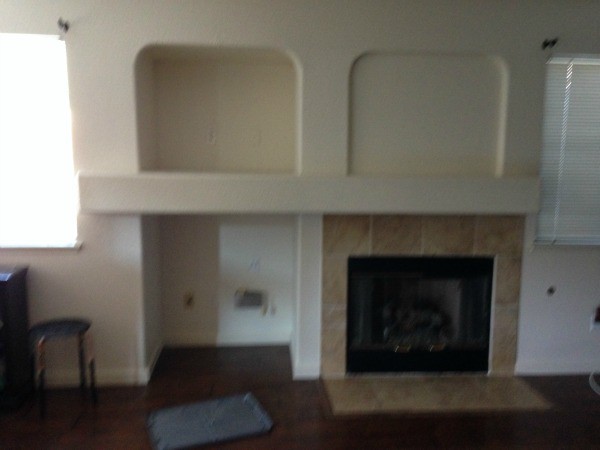
Oh! One last piece I forgot. The fireplace!!
Since we were doing construction, we figured we’d do it all at once. Our old fireplace was dated and had cutouts suited only to 1990s televisions.
(Ugh, horrible before photo, sorry!)
And this is the fireplace now:
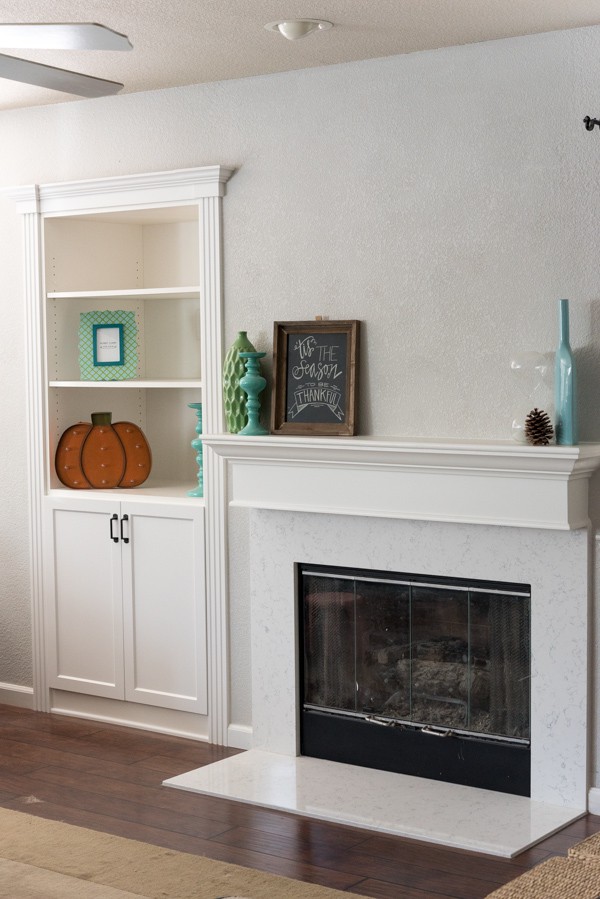
We had extra quartz left over for the surround to tie it all together, and the cabinets match too.
All in all, it was worth it. The time, the money, the stress. I can now work so much easier in my kitchen. It brings me to tears when I look at it, really. Mel and Jordan laugh at me because I’m so happy in there.
Here’s a link of all the items we used in our kitchen:
Counters: DuPont Zodiaq Quartz in Coarse Carrara
Backsplash: Emser Tile Lucente Cascade
Sink: KOHLER Vault Double Basin Stainless Steel Apron Sink
Faucet: Delta Touch Faucet
Pulls: Martha Stewart Bookend Cabinet Pull for Home Depot
Pendant Lights: Pottery Barn Paxton Glass Single Pendants
Counter Stools: Tabouret 24-inch Metal Counter Stools (they come in lots of colors)
Refrigerator: we went with a Kenmore French Door, it’s about 25 cu. ft. (not counter depth) and I’m loving it so far.
Range: It’s a GE Profile Double Oven Slide-In Gas Range. At this time I cannot recommend it – it came with a broken touchpad and it doesn’t cook evenly. I’m probably going to replace it. 🙁
Thanks for reading! What would you put in your perfect kitchen?
Disclaimer: KitchenMart gave me a discount on my remodel for working with them on these posts. We were also given discounts on backsplash tile and countertops. All opinions are 100% my own, of course.
Last Updated on February 2, 2023
Your kitchen looks amazing!! How did you do your trash cabinet? Was it part of a kit? I’m looking to put one in our kitchen too. Thanks!
Dorothy, your new kitchen is BEAUTIFUL! I love everything about it. Your backsplash is gorgeous, and Im super jealous about that sink! It’s huge! ? Congrats girl.
Good read, This blog has provided the helpful data to us, continue the good work.
Featured In