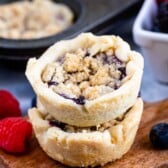
Mini Berry Pies
Mini Berry Pies are so easy and the perfect size for serving at parties! Learn how to make mini fruit pies completely from scratch with crumble topping and homemade berry pie filling.
Servings: 14 pies
Cost: $10
Ingredients
Filling:
- 16 ounces frozen mixed berries thawed (see note)
- ⅓ cup (79ml) water
- 2 tablespoons (16g) cornstarch
- 2 tablespoons (10ml) water
- ⅔ cup (133g) granulated sugar
- 1 teaspoon lemon juice
Crust:
- 10 tablespoons (141g) Challenge Unsalted Butter
- 1 ⅔ cups (207g) all-purpose flour
- ½ teaspoon salt
- 2-3 tablespoons (10-13ml) ice cold water
Crumble:
- 4 tablespoons (57g) Challenge Unsalted Butter
- ¼ cup (50g) packed brown sugar
- ½ cup (62g) all-purpose flour
Instructions
Make the Filling:
- Drain berries really well. Place them in a medium saucepan with 1/3 cup water. Heat over medium-low heat and cook, stirring occasionally, until you notice some of the berries breaking down, about 3-5 minutes.
- While that’s cooking, stir together the cornstarch and 2 tablespoons water in a small bowl.
- Stir in the sugar and lemon juice into the berries, then stir the cornstarch slurry to make sure it’s not clumped. Add to the berry mixture and stir constantly until the mixture thickens, about 1-3 minutes. Once it bubbles and looks thicker, it’s done. Remove from heat and transfer to a bowl or jar to cool completely, then refrigerate at least 2 hours.
Make the Crust:
- Slice your butter and place it back in the refrigerator to stay cold.
- Add flour and salt to the bowl of a large food processor and pulse once to combine. Add the cold butter and pulse just a few times until the butter is incorporated (mixture will be crumbly). Slowly add 2 tablespoons water while running the food processor. Let the processor run about 10 seconds, adding just a teaspoon more water at a time until the mixture comes together in a ball.
- Turn the pie crust ball out onto a sheet of wax or parchment paper laid out on a clean work surface. Top with a second sheet of wax or parchment paper and roll to ¼-inch thickness. Chill 30 minutes.
- Use a 3.5-inch round cookie cutter to cut circles out of the pie crust, re-rolling as needed. If the dough gets too soft, pop it back into the refrigerator to chill it for 15 minutes or so.
- Spray a 12-cup cupcake pan with nonstick baking spray (the kind with flour in it) or grease and flour the cavities.
- Press a round into each muffin cavity, pressing gently so you don’t poke holes in the crust. Chill the crusts for at least 30 minutes before filling.
Make the Crumble and Assemble:
- Preheat oven to 400°F.
- Grate the butter, or dice it small.
- Whisk together the flour and sugar and add the butter, then use a pastry cutter to cut the butter into the dry ingredients until the mixture is crumbly.
- Spoon about 1-1 ½ tablespoons of berry filling into each pie crust and top with about 1-2 tablespoons crumble. Press the crumble to compact it slightly.
- Bake pies for 25-35 minutes, or until the crust is no longer opaque and the crumble looks dry. It won’t brown much. If any of the berry mixture has bubbled up to the muffin pan itself, use a butter knife to kind of clear it so it doesn’t cause the filling to harden to the pan and make the pies hard to remove.
- Cool completely in the pans on the counter before removing. I find it’s easiest to remove them if they’ve been chilled. Run a butter knife gently around the edges and they should pop out.
- Store in an airtight container in the refrigerator for up to 4 days or freeze for up to 3 months.
Video
Notes
- You can use fresh berries if you want, just measure out about 16 ounces.
- Make sure to drain the frozen thawed berries very well.
- Don’t want to make your own filling? Use a canned pie filling!
- Try not to make the crusts thinner than ¼-inch thick or they’ll be harder to remove from the pans.
- Don’t overfill the pie crusts with the berry filling – 1 or 1 ½ tablespoons is about perfect.
Nutrition
Serving: 1pie | Calories: 244kcal | Carbohydrates: 33g | Protein: 2g | Fat: 12g | Saturated Fat: 7g | Polyunsaturated Fat: 1g | Monounsaturated Fat: 3g | Trans Fat: 1g | Cholesterol: 30mg | Sodium: 87mg | Potassium: 47mg | Fiber: 1g | Sugar: 16g | Vitamin A: 365IU | Vitamin C: 1mg | Calcium: 12mg | Iron: 1mg
QR code
Scan this QR code with your phone's camera to view this recipe on your mobile device.
